Part I
Panoramic cameras take photos by rotating in the horizontal plane round their axis, perpendicular to the optical axis of the camera and running through the rear principal point. The frame format must not be less than 2:1. Image of a subject is formed on photoactive material on the arc of the circle. Thus, flat film cameras, like FUJI GX617, Linhof Technorama 617, Hasselblad XPAN, are not panoramic cameras in terms of their construction. They are panoramic only thanks to their photo format, cut from the round field created by the lens.
The history of Russian production-line panoramic cameras probably started with FT 2, designed by Hero of Socialist Labour Fyodor Vasilievich Tokarev, well-known for his other creation – TT gun. The chief photo engineer at the Krasnogorsky Engineering Factory E. V. Soloviev, who by the way designed several panoramic cameras on his own, had not a very high opinion of it, but the production fate is rarely governed by merits of the construction. FT cameras, manufactured at the Krasnogorsky Factory, were followed by Horizont cameras (Designed by: Litavin V.V., Kutepov E.N., Padalko A.Y., Shuvayeva A.N. Engineering works had been started by Padalko and Melnikov). Horizont S3 has been manufactured up to now. Aside from 35-mm film panoramic cameras, there was another Horizont - medium format Horizont 205 RS. I had no opportunity to work with these cameras, and now the age of film is over. I have taken a fancy for making out what such a construction may give to digital cameras. Lee Frost's "Panoramic Photography" mentions digital panoramic cameras from Seitz (Roundshot) and Spheron. Unfortunately, no one was so kind as to lend them to us for testing, the reason may be in the price. Roundshot Superdigital II costs 8670 Swiss Francs. Its vertical resolution is 2700 pixels. It works together with a notebook. Proceeding from the above said, I tried to make my own camera to become a mock-up for evaluating technical capacities of such cameras rather than a working camera.
History
Alexei Fedorchuk gave me a Paragon Page Express Color edge-fed scanner. This scanner is also known as Sheetfed Scanner SFC-II.
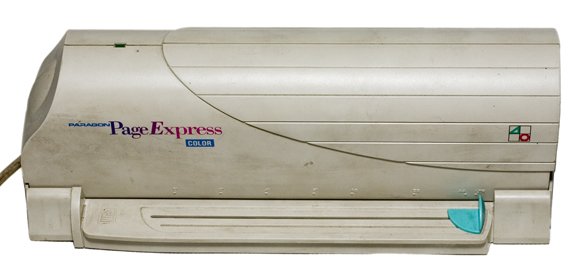
The scanner was in excellent condition and could have worked for many years to come, but for one fact. It's designed to work with a parallel port. But firstly, none of my computers has it; secondly, the latest driver for it was written for Windows 95. It also works under Windows Me, but of course it fails under XP. Besides, there are several drivers for Windows NT. But many of them are initially buggy, beta versions. All of them cause the blue screen of death when installed under Windows XP. But all that happened later. At first I tried the scanner with my old Mitac 5026 notebook under Windows 98. Sorry as I was, I still decided that we wouldn't need it anymore and thus it could be taken apart. I was sorry, because such models are not manufactured anymore. Interestingly, they can be removed from their base and be used to scan maps of arbitrary length, for example.

In order to test panoramic photography features of the scanner, I just had to get the scanner out of its case, remove all mirrors, move the lens deep into the lens mount to get infinity focusing, and slightly reconstruct the reduction gear box by adding gears from a broken CD drive.
A good reduction gear box is half of the success for a panoramic camera. That's why I probably had better design quite a different drive. It's not very difficult, but takes up much efforts. So we decided not to waste time on it and content ourselves with the makeshift solution, until camera prospects are clear. We used gears from the scanner's reduction gear, but they were rearranged to increase the gear ratio. The last gear from this reducer is matched to a large fixed gear from the CD drive. A steel bearing axle runs through this gear, round which rotates the entire construction. The axle is movable in a hard piece of wood. At first we drilled a hole a tad narrower than the axle, and then we ground it in to the axle diameter. We inserted the axle into an electric drill and ran it into the hole. The wood near the hole was impregnated with machine oil. So we got a high-quality plain bearing. The reduction gear provides normal frame proportions for a lens with the focal distance of 8 mm. Longer-focus lenses make the frame constricted. As the reduction gear has a constant gear ratio, the only way to adjust it is to change the number of steps. For a 16-mm lens the scan resolution is doubled. Thus, a doubled number of lines is written, and the number of pixels in a line gets twice as many as the number of photo sensors. The image is then processed in a graphics editor: its vertical size is reduced so that we get the right proportions and all pixels are again true, not interpolated. As the axle is fixed relative to the photo sensors, the above mentioned condition that the axle must cross the rear principal point is true only for the Peleng lens. But if you shoot distant objects with a longer-focus lens, this condition violated has practically no effect on the results.
|
|
|
|
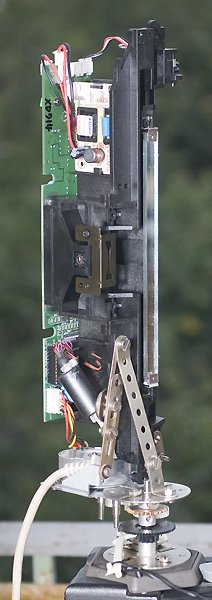
The first version of the camera. Extra
mirrors are not removed yet. The axle is fixed in a meccano
bush with huge backlash.
|
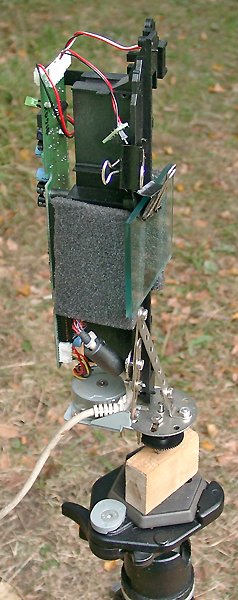
The next modification with a wooden bearing
and a heat filter before the native scanner lens. I shall dwell
on the filter in the next part of the article.
|
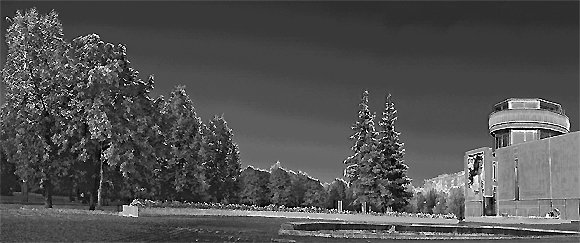
The system started working immediately and provided such decent results that I decided to finish off this camera so that I could use it not only in the laboratory, but also outdoors. I found myself on a unploughed land with lots of pitfalls, where, unfortunately, I had to fall. Below is a miniature of my first color cyclorama.
It looks more natural if you view it in parts, for example using PhotoVista viewer. This one requires Java support in your browser.
Pitfall One. LPT port.
My Fujitsu LifeBook P2110 has no parallel port. An attempt to connect the camera via USB-LPT adapter was a failure, computer detected it just as a printer port. That's why I bought CI-66201 1P SPP/EPP/ECP CardBus Card at the price of a cheap flatbed scanner. (In fact, for the same money you can buy a USB flatbed scanner and reconstruct it. There will be no principal optical or mechanical differences in this case. But there are some pitfalls on the driver field. Before scanning, the majority of flatbed scanners calibrate themselves using a white stripe attached on the glass. If you disassemble a scanner, it usually refuses to work without calibration. But edge-fed scanners are calibrated by a special card, calibration results are written into a file and then used for scanning. That is, when you cannot calibrate a scanner, you can cheat it by feeding a file with a set of digits).

The box ran "Supports Windows XP, 2000, 2003". But as the CD also contained drivers for Windows 98 – ME, I decided to install ME (as I was quite satisfied with the Windows 95 driver, which works fine with it) and try to boot the system. Nothing of the sort. The port appeared in the registry in Ports (Com & LPT) section, but it had no number. Neither the printer nor the scanner detected it. So, after a week of hardships, the only combo that was functional, i.e. detected the port and the scanner, turned out Windows 2000 with the NT scanner driver. Unfortunately by Sod's law, the first version I found turned out a beta, which could hardly work without a calibration file (as the Windows 95 version). It looked as though only 30 color hues were used out of the 256 available. Besides, sensitivity of the blue, green, and red channels in daylight differed much. The best artistic effect could be seen on black and white photos, obtained by subtracting one channel from the other :-)

An attempt to feed the scanner with a calibration file, just 18 KB, that is 18000 numbers, gave a lot of interesting results, none of them satisfactory. Fortunately, I found another version of this driver, which yielded similar results to the Windows 95 driver. That's where I decided that the hardware battle was over.
First shooting attempts
The native scanner lens does not have a variable aperture. That's why you can control the exposure either via the driver menu (which is not efficient in this model, as the effect looks more like correction in Photoshop than exposure change), or using an attenuator filter. The matrix of the scanner is quite sensitive. The ball park (scan time in monochrome mode is divided by the number of lines) exposure of each line is less than 1/60 sec. Taking into account that we already know the lens aperture, we can assess the sensitivity of the bar with photosensitive elements - 100 ISO. This figure is quite relative, as the spectral sensitivity is shifted much to the infrared region. It's true only for shooting in daylight environment with a heat filter before the lens.
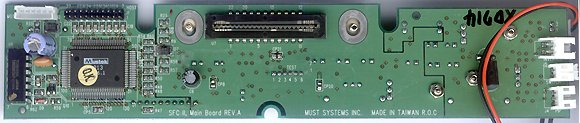
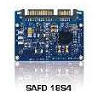
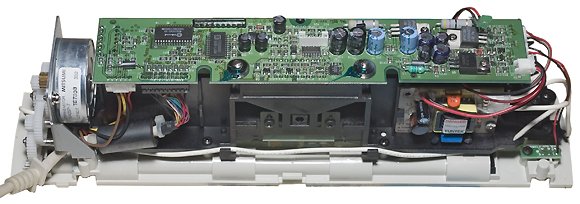
Below are the photos of the scanner mainboard and of the bar with photosensitive elements.
Length of the working part of the bar is 28 mm.
It consists of three bars of 2550 photosensitive elements each.
|
|
|
Microscopic photos taken with various
magnifications by our previous make-shift
camera.
|
As you can see, the sensor consists of three bars, covered by blue, green, and red color filters. That is one and the same region is scanned in different spectral ranges at several motor steps. The number of steps differ for a sheet of paper in a scanner and for objects in a frame. That's why after a photo is taken, we should align the image in red and blue channels with the green one. The procedure turned out rather simple, in fact it can even be automated.
|
|
|
|
The photo before and after the channel
alignment.
|
In the next parts of this article you will learn
about this camera, its photography capacities, and battery run-down
times.
October 19, 2005
Write a comment below. No registration needed!