If you have read the previous
article, you know how wespliced the shots and what we brought from
our White Sea expedition.
It's not very fascinating to show the panoramas on a display because one
is eager to show all even little details at once. The display allows to
view either minute things or the general sight. A sheet of paper has also
definite proportions. I see that the golden section (sides ratio is 1.618
or 0.618) is an ideal form but it is not for panoramas. That's why I'm
looking for the material where one can demonstrate the landscapes in large
scale and with all merits. Epson company produces special panoramic paper
(two sheets of the standard A4 which are connected by the narrow sides
- S041145). Unfortunately, it wasn't available when needed, so we have
to act alternatively. The shop assistants offered two appropriate materials:
very long (8 m), but narrow (10 sm); it was of high quality and stability
but not every printer could use it. And very wide (42 sm) and quite long
(3m); but again, not for every printer. I couldn't choose among the variety
of printers, and the only one I had was Epson Stylus Photo EX. So, I decided
to make two narrow rolls of a wide one and then bought a roll of Artist
material for color Ink jet printing S041132. First it sounded attractive
but not quite clear. Artists used different kinds of material; and on
my way home I recollected them: rocks, papyrus, silk, dry plaster, canvas.
On unpacking I saw that I have guessed: canvas is probably the most popular
artists' material.

Canvas allows to make the photos of large size since its
texture conceals the dot matrix, so you can print with the grid of approximately
120 lines per inch without prejudice to perception. In the previous
article you could find the panoramas of 1500x10000 pixels which you
can printout on the canvas of 0.3x2 m. It's the appropriate width for
the printer (A3). As I had bought the fabric of A2 I have to cut it. First
I thought that it must be hemmed, but then I found out it to be unnecessary,
however you must put the uncut side near the cartridge.

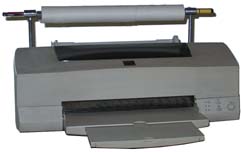
Since Stylus Photo EX is not intended for roll paper, I
had to make a roll-holder and put a sheet of carton for loading without
problems. Another problem is following: on finishing the printer tries
to run the other part of the roll through. It can cause lines on the paper
and none could use it any more. The solution is simple: you have just
to cut a part of the roll in the same size as the panorama. But we were
happy to learn that the calculation made by Photoshop is not equal to
the print size when printing on the non-standard demy paper. Besides,
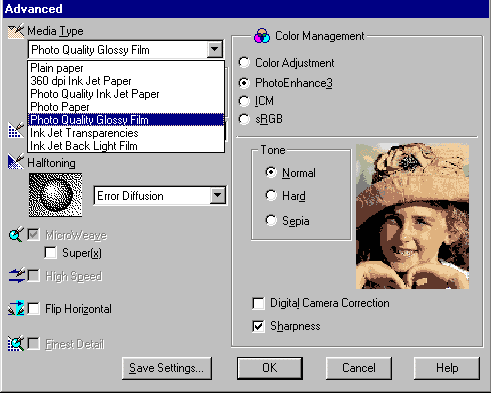
the driver menu doesn't contain fabrics, and when choosing the material
type it's better to set glossy opaque film. In case of photographic paper
setting, you will get the deficiency in purple color.
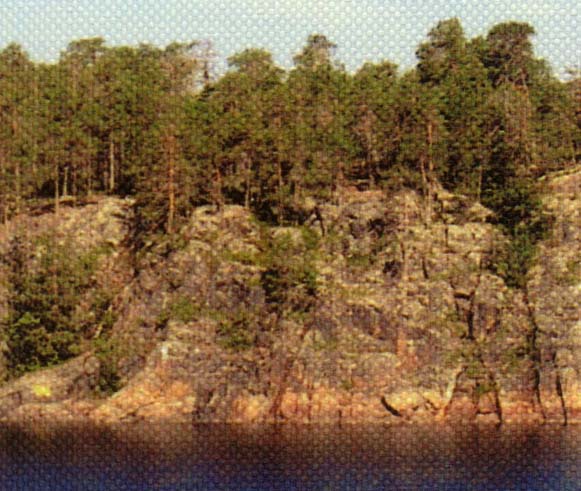
But to my mind, the the game is worth the candle! The print-outs
impressed me much. It's something average of a photo and oil on canvas.
For some pictures, i.e. sunsets and sunrises it seems to be the best material.
And in most cases you needn't to improve the quality because matrix noise
add some artistic effect. Some photodetectors even have the filters such
as "to add noise".
A first of Epson company, Premium Photo Paper, is able to
compete with the best sorts of paper in quality. There produced two types
of it: glossy (S041303) and half-glossy (S041330). I was lucky to get
the rolls 10 sm wide and 8 m long.
The similar problem is connected to the end of the paper.
Since the driver doesn't contain the mode "roll", the printer,
as I have said already, tries to run the paper through (8 m). This paper
is intended only for the last printers Epson 870, 875DC, 1270, 2000P,
however, other printers of the photo series can also use it. There is
also lack of purple color. The best choice in the menu is glossy film.
So, I think it's better to change the original image colors to match.
Having this high quality paper, the color mode choice becomes essential
(Color Management).
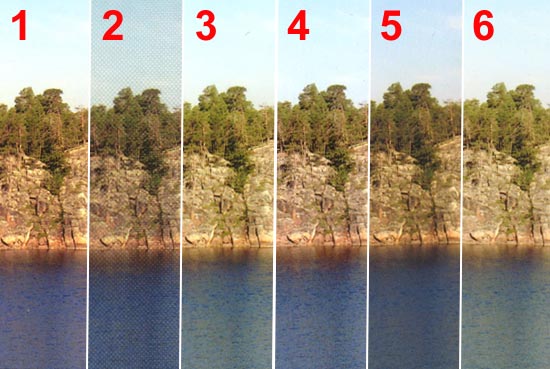
In sRGB mode the image is quite realistic; it's denser than
in Color Adjustment mode with zero correction. And in PhotoEnhance3 mode
the image gets richer, elaboration of details is higher, but the shades
got too much light, sometimes they are even brighter than half-tints.
| N |
Media Type
|
Color Management
|
Media Type
(driver set)
|
| 1 |
PHOTO QUALITY GLOSSY PAPER
(S041126)
|
PhotoEnhance3
|
Photo Paper
|
| 2 |
CANVAS CLOTH (S041132)
|
PhotoEnhance3
|
Photo Quality Glossy Film
|
| 3 |
PREMIUM GLOSSY PHOTO PAPER (S041303)
|
PhotoEnhance3
|
Photo Paper
|
| 4 |
PREMIUM GLOSSY PHOTO PAPER (S041303)
|
PhotoEnhance3
|
Photo Quality Glossy Film
|
| 5 |
PREMIUM GLOSSY PHOTO PAPER (S041303)
|
sRGB
|
Photo Paper
|
| 6 |
PREMIUM GLOSSY PHOTO PAPER (S041303)
|
ICM
|
Photo Paper
|
While using the printer, I have made some changes in the
drivers: PhotoEnhance3 replaced PhotoEnhance2. However, new printers have
much more settings. In my opinion, Stylus Photo, Stylus Photo EX, Stylus
Photo 750 can be improved, but the company is not eager to prolong the
lifetime of the old printers and urges us to buy new ones. It's important
to develop not only new kinds of ink, but also new alternative drivers.
It would be useful to add new types of paper and roll load support into
old drivers.
P. S.
We used the native ink as well
as some Goodwill chinese ink. The cartridge worked for 3 ink-pots and
is still "alive". But still, one big particle is enough to destroy
the cartridge completely. And since we are not sure the Goodwill ink is
refined quite well, we won't recommend it, though the price is attractive.
Write a comment below. No registration needed!


