|
||
|
||
| ||
|
||
|
||
| ||
IntroductionAfter some lapse, NVIDIA has released updated drivers for its video cards - NVIDIA ForceWare 90. Such a change in driver versions is usually accompanied by major innovations. For example, support for SLI mode and 512MB video cards in NVIDIA ForceWare 65, support for 64-bit operating systems and Video Mixing Renderer (VMR) in NVIDIA ForceWare 5x.xx, in the previous 8x.xx version - support for dual core CPUs for executing vertex shaders and considerable improvements in PureVideo and SLI support. In this article we are going to review what has changed in ForceWare 90 compared to previous versions. Version 91.28 of the drivers has been officially released several days ago. Reviewers got nearly the same drivers, but a tad older version - 91.27, for their articles about the NVIDIA nForce 500 core logic. The new drivers are developed for all modern operating systems from Microsoft: Windows 2000, Windows XP Home and Professional, Windows XP Media Center Edition 2005 and 2004, Windows XP Professional x64 Edition and Windows Server 2003 x64 Edition. Drivers for 32bit operating systems support all video cards from this company, from GeForce2 MX to GeForce 7900 GTX, 64bit drivers support video cards only starting from GeForce FX and GeForce4 MX. All GeForce4 Ti, GeForce3 and GeForce2 chips are not supported. Overview of New Features in ForceWare 90Here is the list of key changes in the drivers:
The new version of drivers also supports new Socket AM2 platforms, based on NVIDIA nForce 500 chipsets. Like any new version of video drivers, it has fixed some problems with certain combinations of 3D applications and video cards, both single and SLI. Driver files are dated May 18-19, they come in two variants: English interface and localized into several languages, including German, Portuguese, Greek, Russian, Arabic, Hebrew, Chinese, Bulgarian, Slovenian, Italian, Spanish, Czech, Japanese, Danish, Korean, Swedish, Norwegian, Polish, Finnish, Turkish, and French. Interestingly, the interface of the control panel is localized, even if you install the English version of drivers, even the help is translated. Localized resources for the control panel are stored in DLL files that end in "r". For example, localized nvdisps.dll (it contains only English resources) will be named nvdispsr.dll. There are several such files - by the number of categories of the control panel. For some queer reason, the English version also contains these files with localized resources. So if you want the original English interface, you can remove the following files from the windows\system32 folder: nvcpluir.dll, nvdispsr.dll, nvgamesr.dll, nvmccssr.dll, nvmoblsr.dll, nvvitvsr.dll, nvwssr.dll - they all contain control panel resources in different languages. Because of the new localized control panel, the 32-bit installation package got much larger. While the English drivers used to be only a tad more than 20MB, the current version is nearly 50MB. Now NVIDIA drivers are even larger than ATI drivers. This change is insignificant for broadband users, but will be à major nasty surprise for most people that use slow connections, such as dial-up and GPRS. But unlike ATI CATALYST Control Center, based on Microsoft .NET (Visual C# or Basic .NET), the new control panel from NVIDIA does not require Microsoft .NET Framework, works much faster, and requires much less system resources. All changes that have to do with improved video decoding and post processing will be reviewed in detail in the corresponding article entitled "AVIVO vs PureVideo". But even now we can say that many users note improvements in such video decode tests as HQV benchmark. Of course, we'd like to get real improvements noticeable in usual applications, not only in this specialized test. In this article we'll focus on the new control panel, which is absolutely different from what was used in NVIDIA software. Unified Control Panel from NVIDIAThe new NVIDIA Control Panel is perhaps the biggest change in ForceWare 90 and certainly the biggest one that impacts usability. NVIDIA control panel is intended for simple and quick configuration of system components from this company in a unified shell, which fits well NVIDIA Unified Driver Architecture. Control panel is specially designed for coming Microsoft Windows Vista, it will be completely integrated into this operating system. The artwork of the new utility for configuring NVIDIA products was designed by a special GUI team. It should simplify ForceWare configuration and facilitate the usage of other utilities from this company. The new interface offers intuitive settings not only for NVIDIA video cards, but also works as a shell for other software, such as nTune, that controls some parameters of nForce core logic. Key features of the control panel:
The control panel allows: configuring key parameters, like screen resolution and refresh rate; changing 3D rendering options to get an optimal combination of quality and performance, color settings on the whole and video settings separately, TV format settings; changing specific settings: PowerMizer for notebooks and Frame Synchronization for workstations. Here are the new features available only from the new control panel: previewing 3D image quality, thermal monitoring and plotting a temperature graph, color temperature correction and improved color correction for video formats (VMR9 and overlays), additional video post processing: noise reduction and sharpening. NVIDIA control panel can be opened in several ways:
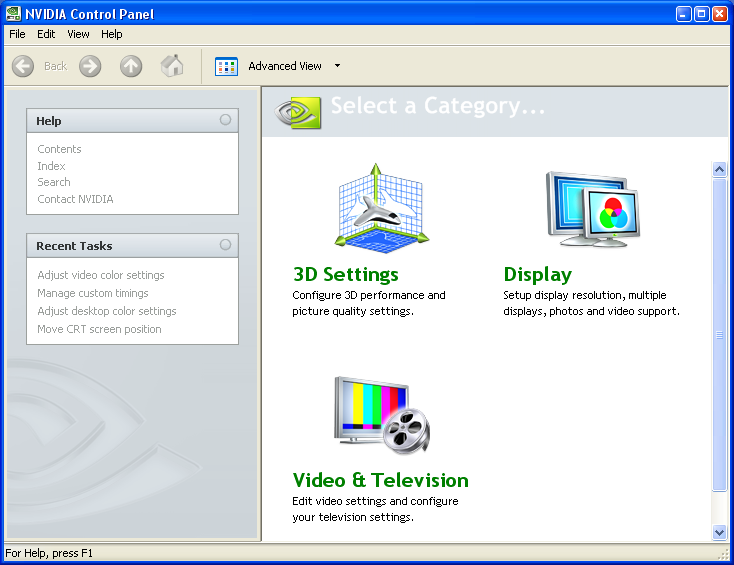
Control panel offers a simple interface to modify video parameters of the driver, its main window is split into four areas:
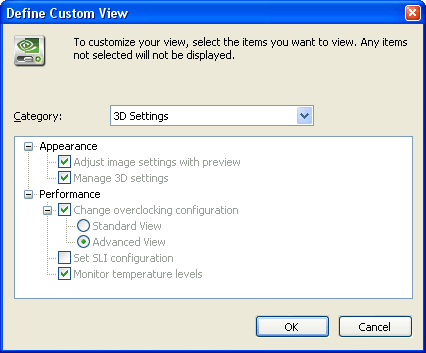
Let's proceed to the most important - categories. That's what you see on the main task area: 3D Settings, Display, Video & Television - these are all so-called categories, parameters and settings united by certain criteria. Icons for each installed category will be added to the main page. For example, when you install nTune, you will see a corresponding icon there. The list of categories on this page depends on a given system. For example, the Mobile category will not be available for desktop systems, Workstation will appear only in computers with Quadro FX video cards.
There is a page for each category with a list of tasks you can do. Each task contains a list of parameters, which can be changed or which start wizards on a new page. Note that when you place a mouse pointer over any of parameters, you see its description and possible usage scenarios. For example, a description of overclocking parameters runs that factory defaults are safe and will do fine for most users, but if you want to increase performance, you can try to specify custom clock frequencies. So, let's review each category. 3D Settings3D Settings page allows to change the main settings of video cards, to configure the quality and speed of 3D rendering. A list of available tasks depends on a given system. For example, if it's possible to install two video cards in SLI mode, you will see the "Set SLI Configuration" task with a brief explanation what should be done to get higher performance - you just have to install the second identical video card :). 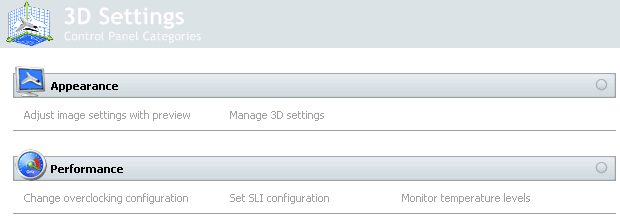
Main tasks on 3D Settings page: Manage 3D Settings In my opinion, it's the most important task for the control panel of a modern video driver. It allows to change the quality and performance of 3D applications that use Direct3D and OpenGL. Here you can change all previously known settings, such as anisotropic filtering and antialiasing levels, enable/disable texture filtering optimization, some other features: antialiasing for semitransparent surfaces and gamma-correction of antialiasing. 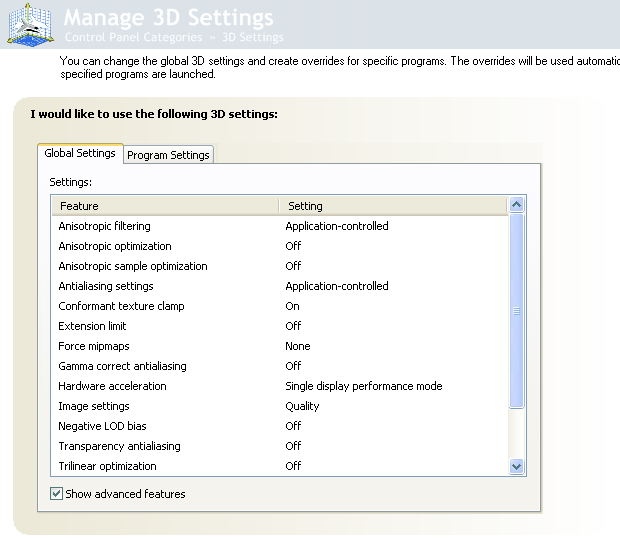
If a user has two video cards installed in SLI mode, specific settings appear along with usual ones, the list of antialiasing modes is supplemented with two methods, there appears an option to select how the load is distributed between two video cards, "SLI performance mode" : 
The same page is used to create and modify 3D setting profiles for certain applications, which will be automatically applied when they are launched. In my opinion, they are quite convenient to use. The only gripe I have is fixed dimensions of control elements - the lists of games and settings are narrow, while the other room is just empty. They could have increased the vertical size of these elements even without making control elements resizable - there is so much empty space between them, occupied by just two lonely buttons. 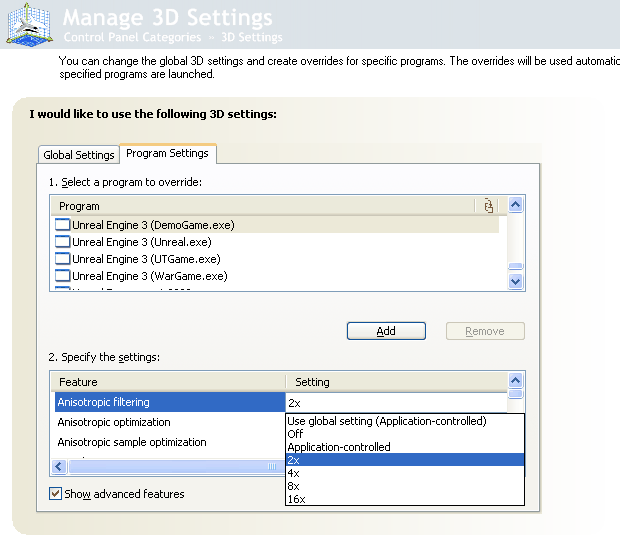
Unfortunately, profiles for 3D applications in the first release of ForceWare 90 are buggy. After you add a profile and change its settings, the data are written to the registry, they are used by drivers for a given application, but this profile may disappear from the control panel. When you re-add it, its settings are reverted to defaults, but the drivers still use the old settings. Users also complain that profiles do not store modified settings - an application uses modified settings, but the control panel does not show them. Adjust Image Settings with Preview If you know little about modern 3D technologies and configuration of video cards, you will like the "Adjust Image Settings with Preview" page. It's a window that renders a small demo scene in real time and shows changes in image quality that depend on the main settings: anisotropic filtering and antialiasing, texture filtering optimizations, etc. 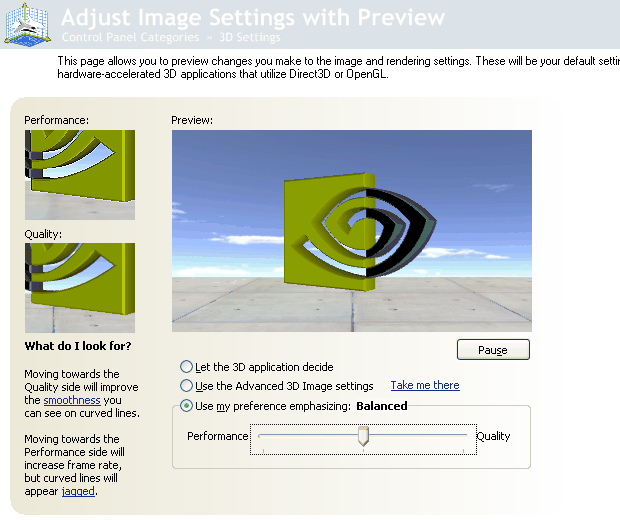
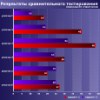
The above-listed settings are adjusted on the "Manage 3D Settings" page. But the preview page also has a quality slider to simplify things, it has three possible positions: Quality, Balanced, and Performance. When you use this slider, quality changes are reflected immediately in the preview window. Fragments of screenshots corresponding to Performance and Quality settings are shown on the left. It's convenient for most users, but advanced users should know the list and values of settings that change when you use this simple control:
These values are selected well. But it seems to me that the difference between Performance and Quality is not sufficient. It might have covered a larger range of values. For example, Performance might have the Image Settings value set to Performance. Quality - Best Quality. Besides, the best solution for the quality mode would have been forcing anisotropic filtering to the maximum level instead of settings it to 8x. It would have been very convenient to have settings from the "Manage 3D Settings" page on the same page with the preview. So that all changes are immediately shown on the preview pane and you don't have to switch between these windows, especially as it's not very convenient in the new control panel. Change Overclocking Configuration The title is pretty self-explaining - this page serves to change GPU and video memory clocks. Change Overclocking Configuration is disabled by default in the drivers. You should change the CoolBits key in Windows registry to show this option. There are almost no changes on this page compared to the previous driver version. There is an option for automatic overclocking (we haven't tested it), when GPU frequencies grow only when a 3D application is started. There are manual settings to control the frequency within 860/1440 MHz (GeForce 7800 GTX) as well as an option to find optimal frequencies automatically. 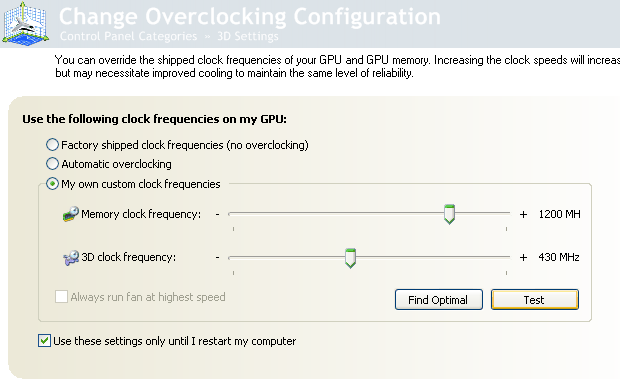
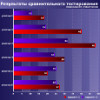
I cannot evaluate how precise the optimal frequency is determined. The progress bar easily reached the 100% mark on our testbed, then the frequencies grew from 430/1200 to 473/1286, that's all. Perhaps, this algorithm is not quite correct in the new control panel, as well as manual stability tests you can run by clicking the Test button. Set SLI Configuration This page appears only in SLI-ready systems. Even if such a system has only one video card installed, the page suggests that a user should learn about SLI capacities by visiting a special web site. When two SLI-ready cards are installed, you can select a configuration by enabling/disabling SLI. If the drivers are installed on a system that supports the four-chip mode, the list of available options grows - you are given a choice of SLI mode for two or four chips. 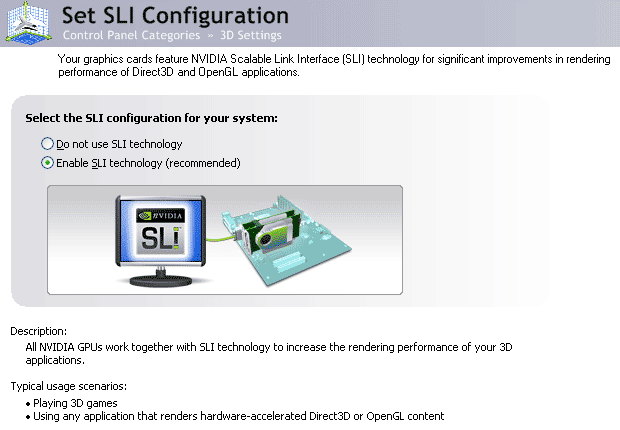
This is a new feature in the control panel. At last we can see the temperature graph on the GPU temperature monitoring page, not just the current temperature. Though the design is questionable, this graph suspiciously resembles some third-party monitoring utilities. For example, RivaTuner, the first to use many interesting ideas. 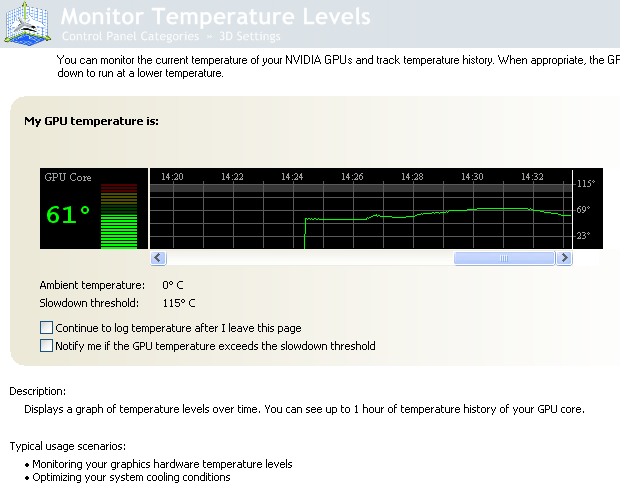
But let's admit that such a feature in standard driver settings is welcome! Especially as there are plans to implement background temperature monitoring (judging by text inscriptions) - the temperature graph will be plotted even when the control panel is closed. Though this function may slow down the system, this performance drop will hardly be significant. This mode does not work so far, temperatures are not monitored when you close the control panel. There appeared a nice feature - a scale that shows whether the temperature is within normal limits. If the temperature is in green zone, everything is OK. If it's in the red zone, there is a problem with cooling. There is also a yellow stripe between these zones, it should caution a user. DisplayThe second page is called "Display". It contains various tasks that have to do with output settings. Here you can configure screen resolution and color depth, adjust each channel of the output image, change the type of output to several monitors, and pivot the image. 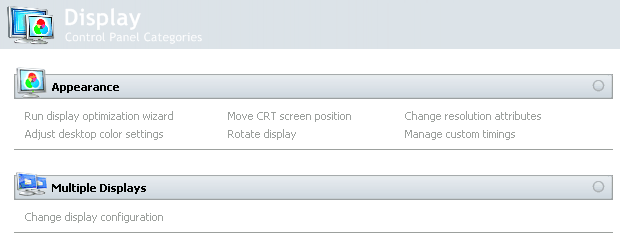
The main tasks on the Display page: Change Resolution Attributes This page allows to change color depth, screen resolution, and refresh rate. There are no significant changes here. Everything is like in the old version. One and the same page is used to choose screen modes for all output devices: 
Adjust Desktop Color Settings Everything is left unchanged here, the page allows to adjust color settings (brightness, contrast, gamma, etc) for 2D image, on the whole as well as for each color channel separately. There are three preview images to facilitate adjustments: a couple of photos and a test chart. 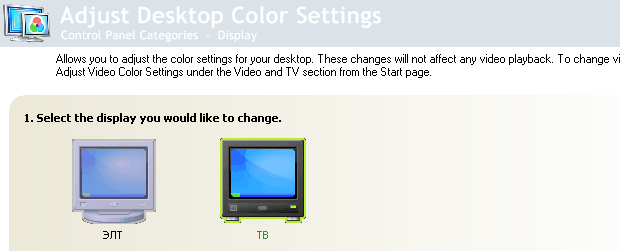 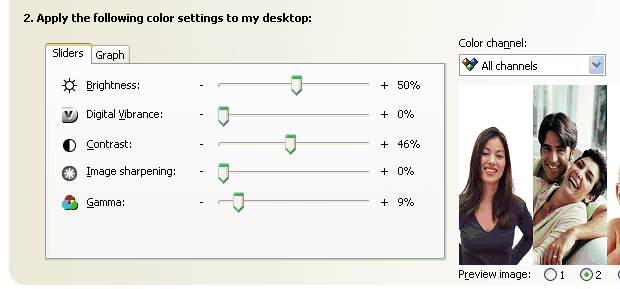
Manage Custom Timings This task adds new modes for monitors with nonstandard resolutions, refresh rates, and other parameters. A user can specify various timings, synch, and refresh rates for his/her modes. 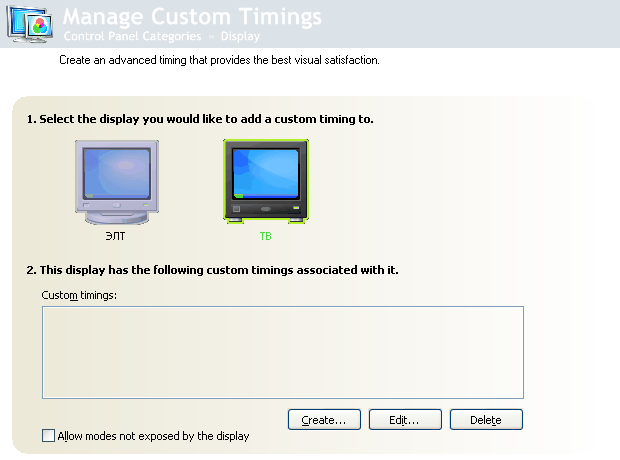
This setting will be useful for displays with resolutions, which are not included in the standard list of resolutions supported by a video card. Lots of parameters are available, when you create a custom mode: 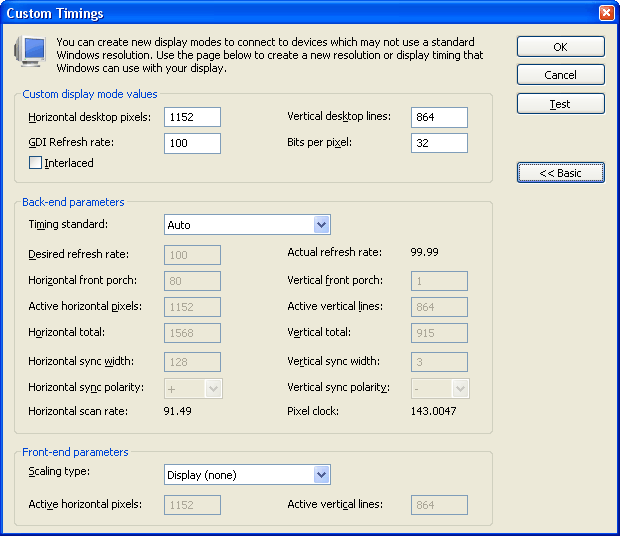
Change Display Configuration Here you can configure video output to several devices (NVIDIA nView), two or more displays: a single monitor, identical output to two monitors, expanded desktop (vertically or horizontally), DualView. We found no significant changes compared to the previous version: 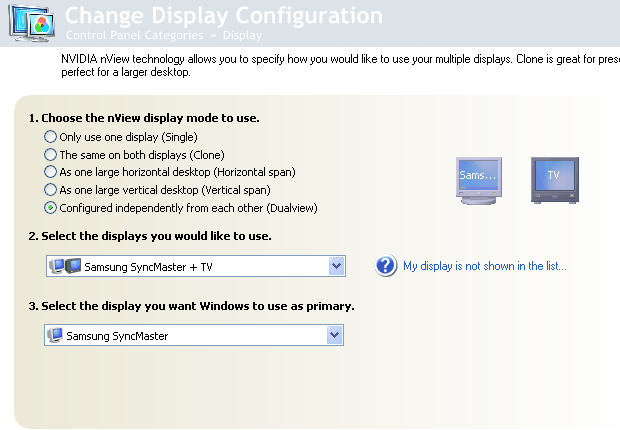
Run Display Optimization Wizard This wizard hasn't changed since the previous versions. Move CRT Screen Position This feature was also available in previous driver versions - moving the image on CRT monitors in four directions. I shall not publish screenshots: no changes here. Rotate Display The same concerns Rotate Display. Nothing has changed since the previous versions. This task rotates the output image on a monitor, so that you can pivot it by 90° and 180° clockwise and counterclockwise - a nice feature for monitors that can be rotated. Video & TelevisionAnother self-explaining page with tasks. These are brightness, contrast, gamma, color optimization of video output and TV out, color temperature correction, some other related tasks. 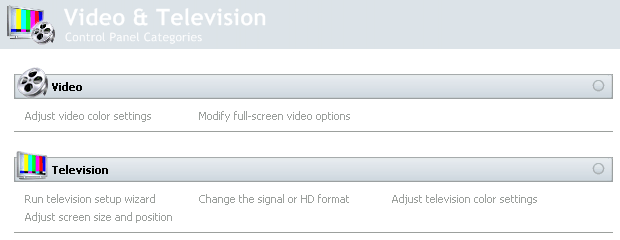
The main tasks on the Video & Television page: Adjust Video Color Settings This page contains a lot of settings for video output to overlays and VMR9 playback: brightness, contrast, gamma (including per-channel controls), color temperature adjustments, post processing settings: noise reduction and sharpening. The last two options and color temperature correction have appeared only in ForceWare 90. And they really work well. 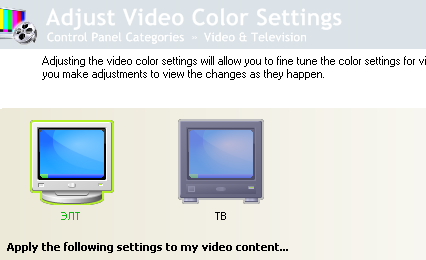 
Adjust Television Color Settings It's similar to the previous item, but for adjusting brightness, contrast, and other settings of a TV-Out. The range of settings is not that large, but it's not necessary, as a TV-set must have its own controls.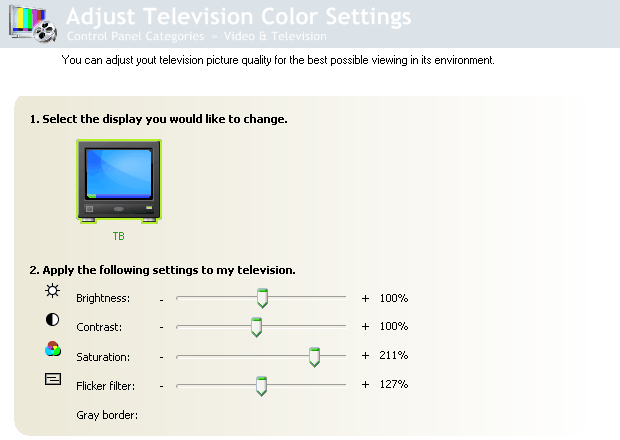
Change the Signal or HD Format On this page you can change the format of a TV-Out signal, both standard and high definition (HDTV). If an HDTV device is connected to the component or digital DVI output, the list contains corresponding HDTV formats: 480p, 480i, 720p, etc. 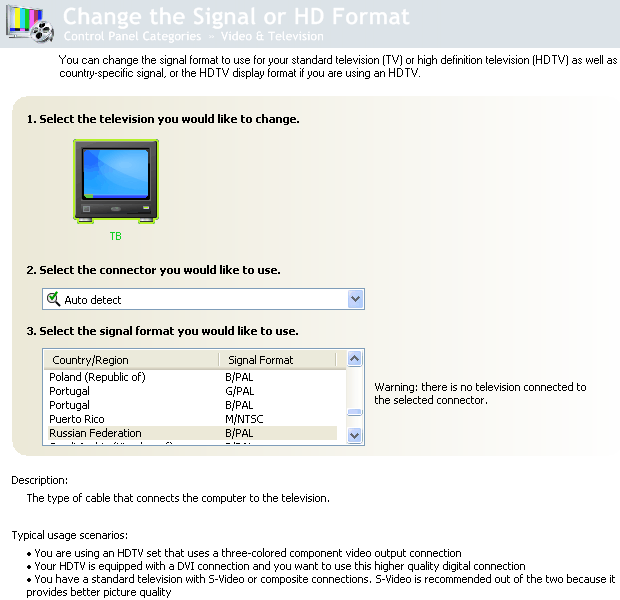
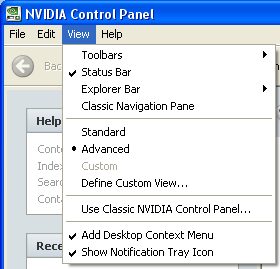
Adjust Screen Size and Position This page hasn't changed since the previous version. It's used to move and resize the image output to a TV-set or an HDTV device. Modify Full-Screen Video Options This task enables full-screen mode on the second monitor, while the same video is played back in a window on the first display. There is nothing difficult or interesting on this page, it looks exactly as it used to be. Run Television Setup Wizard It starts a wizard to setup TV output. It's exactly like in the previous drivers. Mobile and WorkstationBoth categories are not available for gaming desktop systems, so its description will be brief. The first category works on notebooks with NVIDIA GPUs and includes tasks to configure PowerMizer and backlight in order to increase battery life of a notebook. The Workstation page appears only on computers with professional video cards - NVIDIA Quadro FX. A list of available tasks depends on a given model, including the following: settings for SDI Out, G-Sync, SLI mode for professional video cards, etc. ForceWare 90 drivers use the new control panel by default. But unlike ATI CATALYST, you can get back to the classical interface of the control panel - you just have to open the View menu and then choose "Use Classic NVIDIA Control Panel". 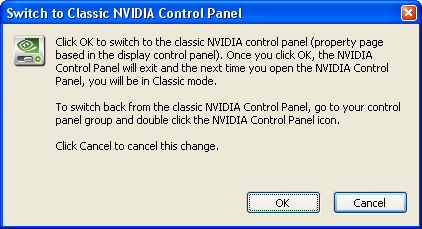 Returning to the new interface is just as simple - open the Control Panel User Interface page and choose "New NVIDIA Control Panel" 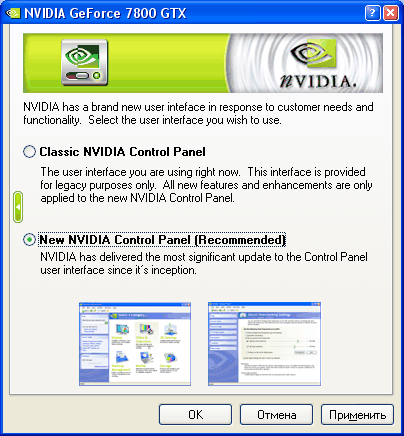 Users can switch between the classic and new interfaces of the control panel, but NVIDIA drivers will use the new control panel by default. Unfortunately, there are no plans to modify or add new features to the classic control panel, though it still exists in the new drivers. ConclusionsThe new control panel of ForceWare drivers, which appeared in Version 91.28, has seriously changed the approach to managing settings. The company has changed the design and unified all panels with driver settings and other utilities, nTune being the first. How well they did it is a subjective issue. In my opinion, everything is rather convenient, the control panel copes with its functions well, but its design and functionality might have been better. For example, we are disappointed with fixed dimensions of all control elements, it's especially disturbing on the Manage 3D Settings page, where the lists of games and settings are very narrow and don't expand when you open up the window. There are still many functional bugs: non-working background monitoring, bugs with 3D profiles, insufficient overclocking functionality. Positive changes in ForceWare 90: updates and improvements in NVIDIA PureVideo to be reviewed in a separate article, a good control panel for the video driver with 3D quality preview, temperature monitor graph, and convenient configuration of video parameters, unified design throughout the entire control panel with the Explorer interface, full localization of resources and help into several languages. Negative issues of the new drivers: design of control panels is not well thought-out, buggy configuration of profiles for 3D applications, some functions of the control panel do not work, the installation package is now much larger. Alexei Berillo aka SomeBody Else (sbe@ixbt.com)
June 17, 2006 Write a comment below. No registration needed!
|
Platform · Video · Multimedia · Mobile · Other || About us & Privacy policy · Twitter · Facebook Copyright © Byrds Research & Publishing, Ltd., 1997–2011. All rights reserved. |