|
||
|
||
| ||
|
||
|
||
| ||
 The box contents
The accessories are not numerous, but on the other hand, you don't have to pay for unnecessary cables. Unfortunately, the power supply cable and its connector are nonstandard. If you want to change it, for example, for a longer cable, it won't be easy to find a respective one. Specification
* I couldn't find the lamp's service life anywhere. Sanyo keeps it in secret for some reason. I don't understand that because the period of time after which the projector asks to replace the lamp is written in its microcode. Usually manufacturers set this time as a lamp's average service life. It doesn't depend on service conditions, even if you always use it at the lowest brightness. Users will be "pleasantly" surprised seeing the indicator LAMP REPLACE alight after the Sanyo-only-knows-what-period-of-time. Appearance
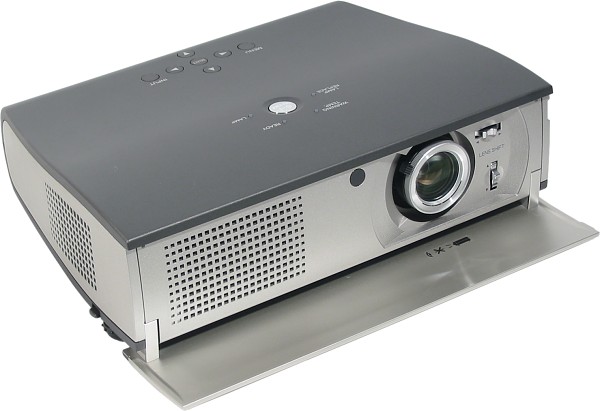 The projector looks simple and unpretentious due to the material it's made
of (dark gray plastic, silvery mat sides and front panel) and a simple box shape
with minimal projections; two control buttons are flush-mounted and absolutely
flat (it's quite difficult to find them by touch). When the front cover is folded
up, it's not easy to recognize a projector in this device. The only prominent
thing is a chromium plated on/off button.  All electrical connectors, a power switch, and a Kensington
lock are placed on the backside below and are recessed. There is also a hole
with the RESET button. 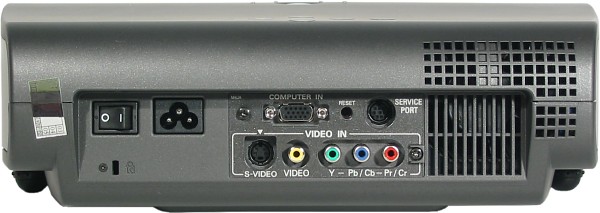 It's not very convenient to connect cables, but at least they will be hidden. On the projector's sides you can find only air vents. In front is
an IR port, the lens and two lens shifters (vertical and horizontal). 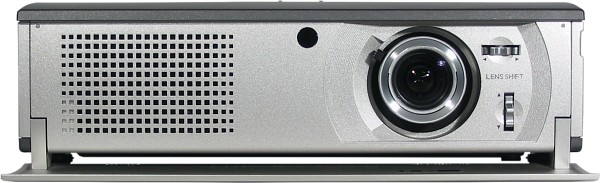 Above are 8 buttons and 4 LEDs.  Underneath you can find two legs in front and one behind.
To adjust its position just raise the projector and fix the legs with special
holders, and then turn the legs by the relief rims to adjust the height
more precisely. The legs look reliable, and the rubber semisphere on the
front legs and the rubber cover on the rear leg won't let the projector
slide along smooth surfaces. Underneath are three threaded holes for jointing
the projector to a holder. 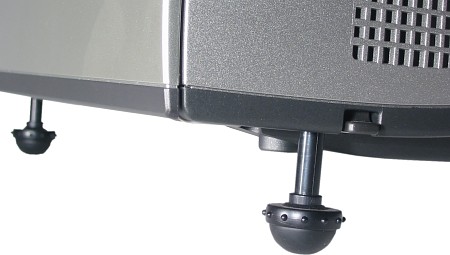 The original dustproof cover protects not only the lens but the whole front panel. Such design has both strong and weak points. First of all, it's quicker to put on and take off such cover than a lens cap especially when the projector is attached to the ceiling. Secondly, this cover is an integral part of the projector instead of being attached to it with a string. On the other hand, such cover protects the lens to a less extent and covers the air vents, that is why you'd better put it on only when the projector gets more or less cold and the fans stop rotating. By the way, the projector doesn't go on when it's closed and goes off right after you put the cover on. Remote control
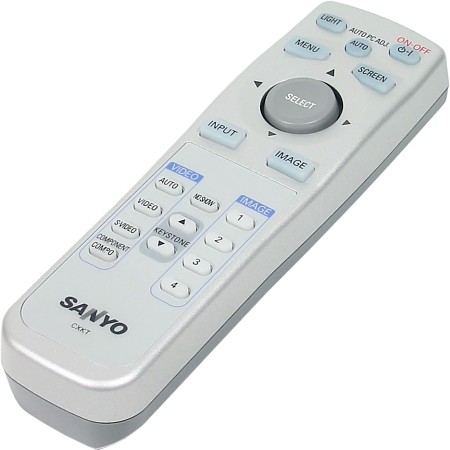 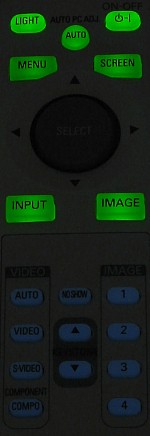
The remote control is pretty small and light (47x30x159 mm at the weight of 125 g with batteries). Like the projector, the remote control is made of silvery gray and dark gray mat plastic, and the buttons are plastic but rubber by touch; all of them except the big round one are semitransparent. It nicely fits in the hand thanks to a small cutout underneath for the forefinger, and all buttons are easy to reach. It's not a problem to find a needed button by touch (at least the main ones). The central button is used for menu navigation (right/left and up/down) and for selecting items (by pressing it in the center). All its positions are well separated and the holddown pressure is optimal. The LIGHT key turns on the backlight for the upper buttons for 10 sec, but you can't turn it off by pressing it once more. The buttons in the lower section phosphoresce with weak blue light after the bright illumination. The RC has two radiating IR LEDs, but the projector has the IR port only in front, that is why the signals will get to it only after being reflected from the screen. The connection is stable when the total distance from the RC to the screen and from the screen to the projector doesn't exceed 7 m. MenuThe menu consists of 6 main pages (in case of the VGA connection
there is one more page with RGB signal settings), which can be accessed
through the tabs on the left. There are 6 buttons for navigation (MENU,
SELECT and 4 arrows, the latter five are replaced
with the joystick button on the RC). The yellow backlight indicates the
current position, and the pictograms show what buttons must be pressed to
select an item or a next level or change parameters. The pages of settings,
image parameters and settings for the RGB signal are divided into 2-3 pages,
and to change parameters you have to pass a long way inside the menu. Choosing
some options can throw you out of the menu. But when you enter the menu once
again, you get to the page you left before. Any changes of parameters which
have several values automatically removes the menu from the screen leaving
only a small bar so that it can be simply to estimate the effect of the regulation.
In the settings you can choose one of six menu positions on the screen. Source of signalThe video-ins are divided into two groups: COMPUTER IN
(VGA and SCART-RGB via the adapter) and VIDEO IN
(composite, S-Video and component). The INPUT button
on the remote control and on the projector's case switches between them. The
COMPUTER IN mode can be selected in the menu, and
the VIDEO IN can be enabled in the menu or with the
VIDEO buttons on the remote control. If you select
the AUTO mode, the projector will automatically scan video-ins:
first the component one, then S-Video and finally the composite one trying
to find an active one. In the menu you can choose a video signal type (in
case of the composite, S-Video and component connection) or leave
it for automatic detection. The VGA connection features a lot of fine settings
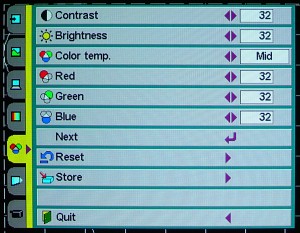
which can be saved in 5 memory cells. 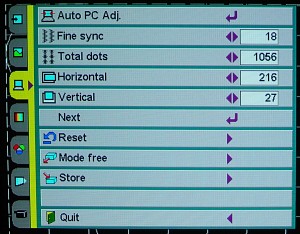 A separate menu page serves for switching between the standard and user settings. The VGA signal can be tuned up in the menu or with the AUTO button. Unfortunately, this function doesn't work correctly all the time, and sometimes it's better to help it manually. In case of the SCART-RGB there is only the 575i format signal which is supported. Projection controlFocusing (with an outer ribbed lens rim) and zooming (with a lever on the lens) is a bit difficult because the lens is recessed into the box. The vertical shifter joins the upper or lower image edge with the lens axis, while the horizontal one shifts it to the left or right by 25% of its width (at the format of 16:9). The digital correction of vertical keystones (+/-20 degrees) can be enabled either in the menu or with respective buttons on the remote control. The SCREEN button on the RC or in the menu switches between the transformation modes: Full (image stretches to the full width), Zoom (image stretches to the maximum width and height), and Normal (image stretches to the maximum height with the aspect ratio being 4:3). Since the matrix's aspect ratio is 16:9, in the latter case you will see black edges on the image sides. The VGA connection provides 4 modes (Normal, Full, True and Digital Zoom). The former two work as the above ones. True - if the original image resolution is not bigger than the projector's LCD matrix resolution, the image is projected as 1:1, otherwise it switches to the Digital Zoom mode where the image can be enlarged, - the SELECT button changes the enlargement degree and the arrow buttons shift the enlargement area. You can also choose a projection type (front / rear / ceiling). Judging by the ratio of the distance to the screen to the image size this is a middle-focus projector, and the focus will be right in front of the viewers, between them or right after them. Image adjustmentObviously, a cinema projector must have a lot of image settings
to match a video signal source, the projector and viewer's subjective perception.
The Sanyo PLV-Z1 excellently copes with it. Contrast, brightness, saturation
(not supported in case of the VGA connection), hue (only for NTSC), color
temperature (four values), multiplication for red, blue and green colors,
sharpness and gamma curve correction are the settings available. Auto grayscale
and Auto fleshtone do not make much effect on the image.
 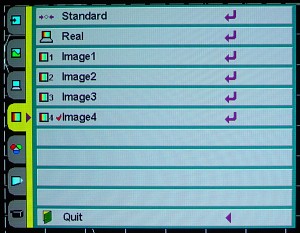 You can switch between them from the menu or with the IMAGE button on the projector (it goes from one profile to another in turn), and a user profile can be selected with buttons IMAGE 1-4 on the remote control. Additional featuresThe NO SHOW button on the PC turns off image displaying,
and the screen turns black. If you press it once again the image will return
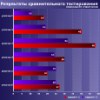
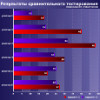
to the screen. 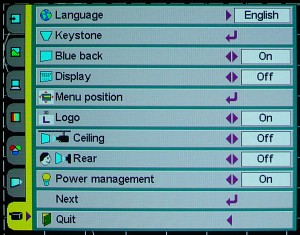 In the settings menu you can disable message displaying (Display), turn on the blue background (Blue back) if the logo signal is not enabled (Logo). The Power management enabled switches the projector to the sleep mode if you don't press buttons for a certain time; the projector wakes up on receiving a signal on the active video-in or when you press a button. If the Power off confirmation option is disabled the projector won't ask for confirmation when turning off its power. The Lamp mode can switch the projector to the low brightness mode. The projector and remote control can have one of two codes (Code 2 by default), the projector reacts to a RC of only the same code. You can change the projector's code in the menu, and the PC's code by pressing and holding the MENU and IMAGE buttons during 10 sec. The mini DIN 8-pin SERVICE PORT CONNECTOR is probably a connector of the RS-232 interface, and presumably supports the remote control. It's possible that respective codes exist and can be even found. Brightness characteristics measurementThe light output, contrast and brightness uniformity resolution were measured according to the ANSI technique. The default brightness and contrast make the gray-scale test fields well discernible (4 darkest and 4 lightest fields with the difference of 5%), and needed no additional adjustment. During the measurements the zoom was set to its max value and the lens was lifted up at the max angle to make this projector equal to other models where the lens is fixed in the upper position. Here are the results for the Sanyo PLV-Z1:
The light output is lower than 700 lm specified but it's acceptable for home theaters with the screens up to 2 m wide. The uniformity is not that good. The contrast is pretty high for an LCD projector. We also took measurements at the low lamp brightness. In this case the contrast and the uniformity remain the same, and the light output fell down to 530 lm. Audio characteristicsThe main problem of this projector is a high noise level. Maybe it's not that noticeable when the movie sound is loud, when the projector is attached to a high ceiling and in the special box etc., but in other cases the only way is to switch to the low brightness mode to make the noise acceptable. That is why we consider this to be the basic mode for home use, that is why the projector goes to the category of 500-600 lm. VGA connectionThe image quality was tested with the SUMA Platinum Geforce2 MX 400 video card installed in the PC working under the Windows XP Professional, with Monitor Nokia Test v1 and v2 programs. White field: bright white color with a bit noticeable non-uniformity. The pixel grid is well discernible, especially vertical lines. The black field looks like a dark gray though the contrast with white is strong enough. When your eyes adapt darkness, you can notice color spots caused by reflections from components inside the projector. The geometry is ideal. Every pixel is well discernible on the vertical, horizontal and chessboard type grids. No moire or noise. The gray scale contains enough hues, and the manual adjustment of the white balance can easily remove deviations from gray. The colors are authentic and bright. The chromatic aberrations of the lens and a small nonconvergence (in the upper corners) do not exceed 0.5 pixel. Interpolation from resolutions lower than 964 x 544 pixels is correct. The maximum vertical frequency is not less than 120 Hz at 600x800 and 1024x768 and 85Hz at 1280x1024. Higher resolutions are not supported. Composite and component video signal source tests For these tests we used Pioneer's top DVD player, European model
DV-757Ai (~$1000) with video DACs of 12 bits 108 MHz and progressive scanning.
For the component signal we used Supra AV3 cable (~$100/meter, Sweden), 1
meter long. Discs used for the tests contain high-bitrate DVD movies, a DVD
disc (NTSC) with examples of static and dynamic scenes and test tables and
VideoCD (PAL, 720x576, MPEG-2, 8 Kbit/s) with original test tables. The image quality worsened as we went from one connection to the other: component > S-Video > composite. The brightness sharpness makes a bit less than 540 TV lines in case of the component connection, about 520 for the S-Video and a bit over 500 for the composite connection. In the composite connection you can notice permanent ripples on the color images. The brightness in case of the component connection reaches 205 TV lines, 105 for S-Video and less than 100 for the composite video-in. The test tables with monochrome color fields and gradient fills show correct color rendering, good brightness and color depth. The projector can't convert an interlaced image into a progressive one but it supports a progressive component video signal. That is why I recommend to use this projector together with a DVD player that supports deinterlacing and has a high-quality component video-out. The progressive scanning makes the image more stable and improves its vertical sharpness. It's especially well seen on static images. The TV signal in the SECAM format (TV-out, an indoor or TV aerial) provides for a stable and correct image with a correct color balance. The cinema theater effect was estimated with several DVD movies of different quality. We started watching the movies at the normal brightness but couldn't stand it for long and switched to the low brightness. But even in that case the brightness was sufficient to project the image on the screen 160 cm wide in the dark room. The colors were good, and the number and range of settings were enough to correct the image to your liking. The color depth is maybe a little insufficient (the contrast of most LCD projectors is lower than that of DLPs), and the image looks like covered with a texture (probably because of the LCD matrix, in particular, because of well discernible pixels). It lowers the overall color depth and flattens the image. Nevertheless, the overall impression (especially given its price) is very good. Most of all I like movies of the 16:9 format as there are no dark stripes, all matrix pixels work and the lamp produces less useless heat. Unfortunately, it's not that comfortable to watch movies on the PC screen through the VGA connection. First of all, the matrix resolution doesn't coincide with the standard ones; plus, the signal goes through double interpolation from the movie resolution to the video card's current mode and then to the matrix resolution. Besides, we couldn't make the video card's vertical scanning frequency coincide with the projector's internal frame frequency, and the image torn and jerked when it shifted horizontally. There is also a flare light from the rear air vent which however does not make a great effect. ConclusionHighs:
Lows:
The Sanyo PLV-Z1 LCD projector can't boast outstanding characteristics
but has an attractive matrix with the aspect ratio of 16:9 for the cinema
use. The price is attractive as well. If you want to assemble a budget home
theater and can compromise between brightness and noise and stand the rainbow
effect of DLP projectors, the Sanyo PLV-Z1 can be a good choice.
|
Platform · Video · Multimedia · Mobile · Other || About us & Privacy policy · Twitter · Facebook Copyright © Byrds Research & Publishing, Ltd., 1997–2011. All rights reserved. |