|
||
|
||
| ||
|
||
|
||
| ||
Our testlab got hold of another Cooler Master accessory for a PC case - CoolDrive 4. It's a symbiosis of the AeroGate 2 fan controller and the CoolDrive 3 cooler for hard drives. 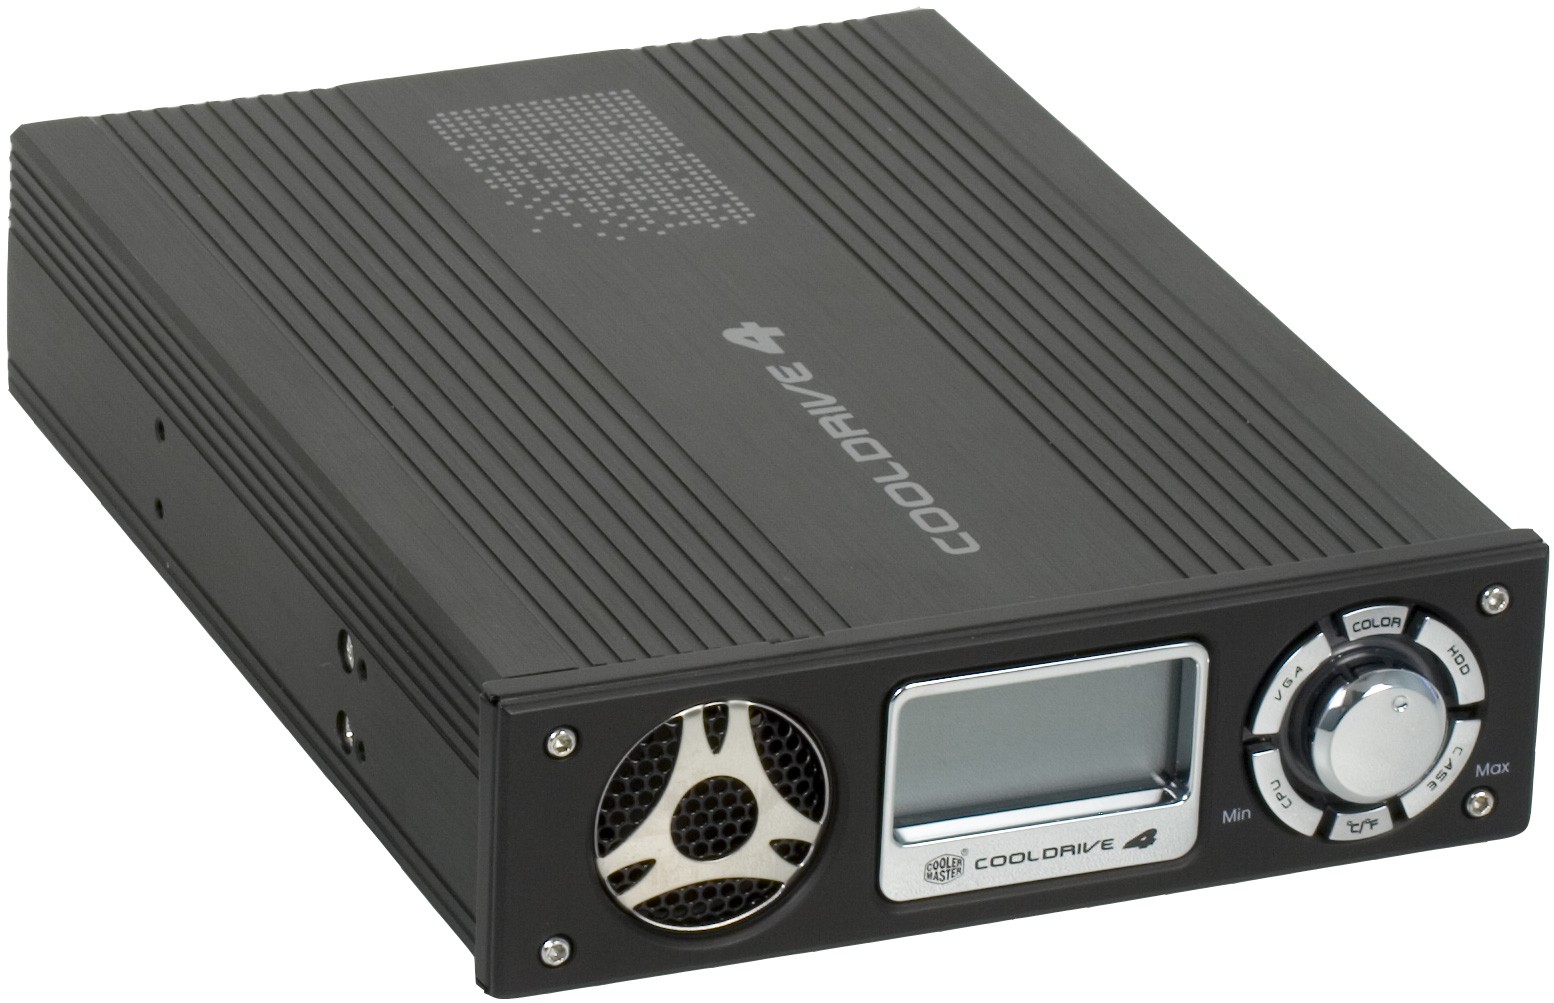 SpecificationsCoolDrive 4 is a metal box to be installed into a 5-inch bay. Dimensions:
Key features:
Net Weight: 663 g. Temperature monitoring range: 0°C - 90°C (32°F - 194°F). Package ContentsCoolDrive 4 ships in a standard small cardboard box for Cooler Master accessories. The box itself is very colorful, it shows off photos of the device at different angles as well as brief specifications. The bundle includes:
The manual has no pictures. This fact may complicate the installation procedure. So we cannot say that HDD installation for CoolDrive 4 is intuitive. The bundle also contains a note saying that the device revision is updated. Here are the differences of the new revision:
The bundled thermal sensors have no insignia, but fan cables are marked as CPU, VGA, and CASE to facilitate their identification. You won't have to guess to what channel to plug them. Exterior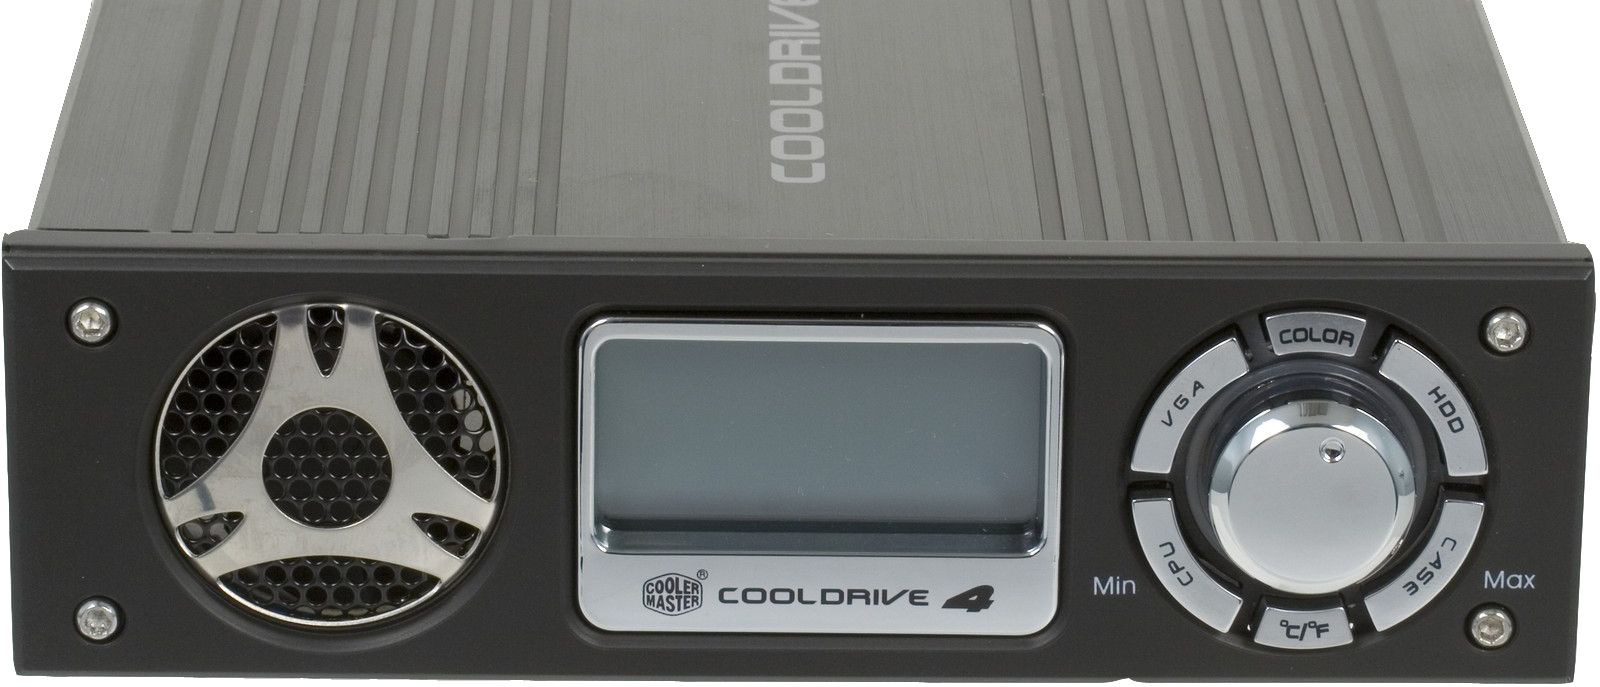 The front panel of the device houses the following elements: a protective grille for the bundled fan, which also acts as a dust filter. 4.5cm LCD display with blue backlight, and a group of control buttons around the main dial. The LED displays the following info:
The device contains seven buttons: six buttons around the dial and the dial itself, which can also act as a button. HDD, VGA, CPU, and CASE buttons display temperatures and RPM readings of the corresponding channels. The COLOR button changes a backlight color of the dial, including turning it off. The C/F button allows to switch between Centigrade and Fahrenheit temperature systems. There are eight mounting holes at the sides - four at each side. This device is installed like an optical drive for a 5.25" bay. The bottom is removable. It's a thick plate made of anodized steel (about 1 mm thick). When removed, it opens access to connectors on the inside of the front panel - that's the only way to access them. 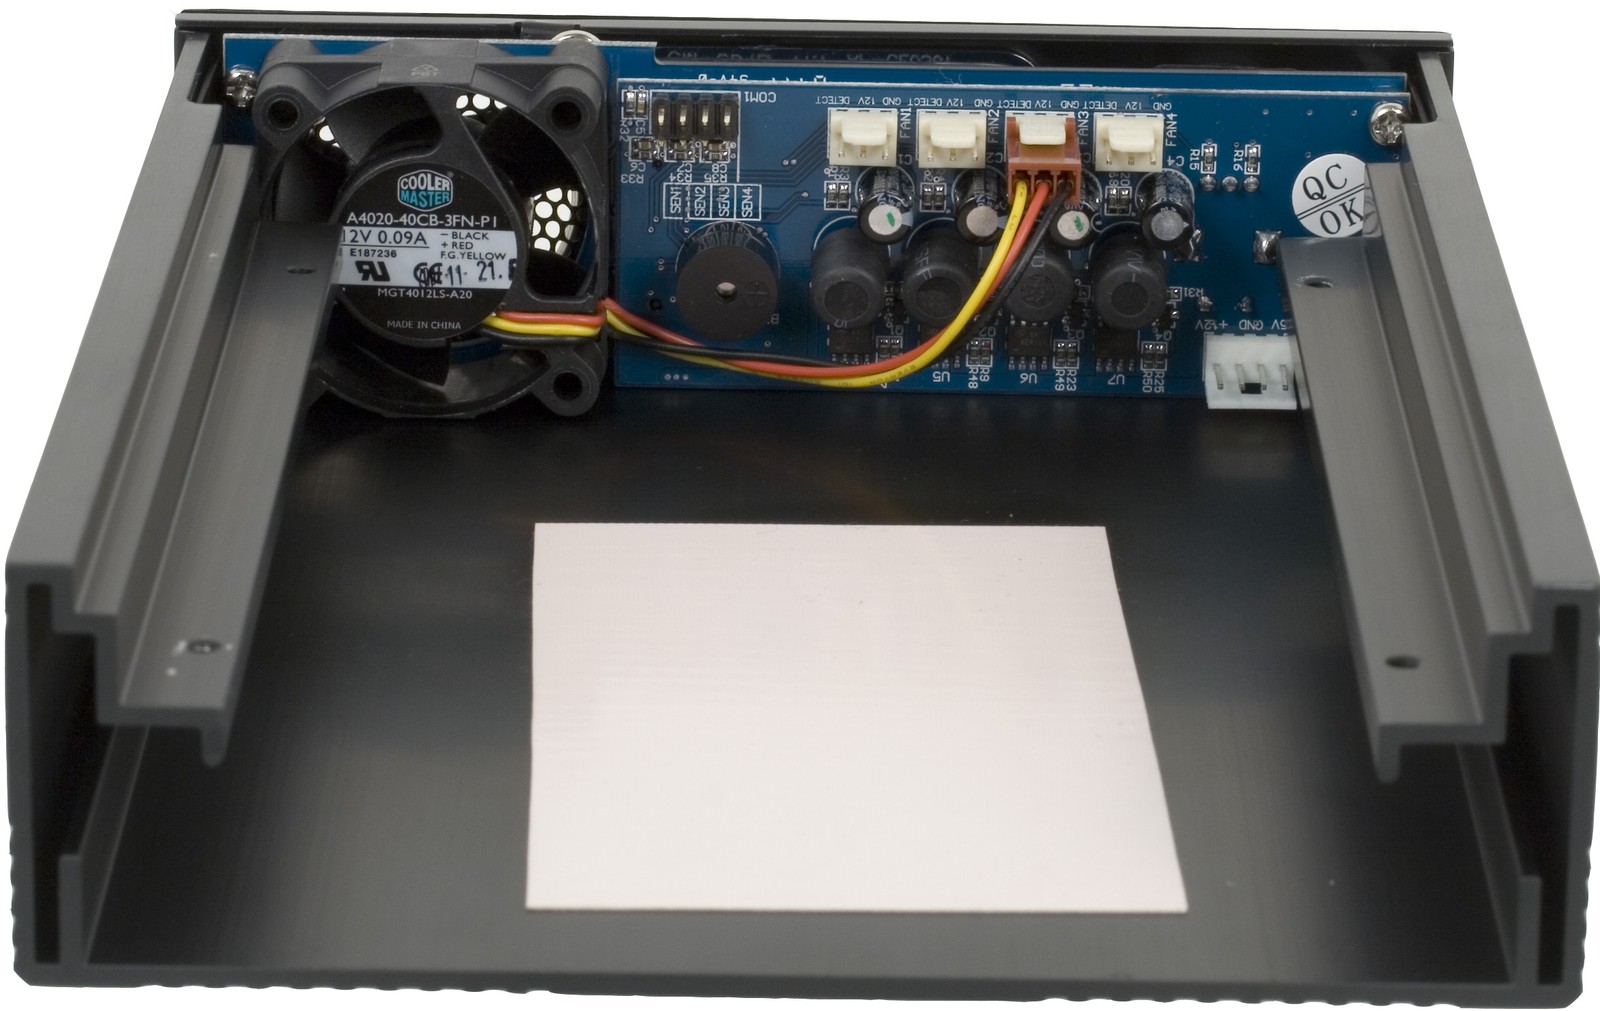 The inside of the front panel contains the following elements: a preinstalled 40x40x20mm fan, a header for thermal sensors, four fan headers, as well as a power connector. Thick porous padding is glued on the inside of the top. It may seem to act as thermal interface, but it fact, it just reduces vibrations from a hard drive to the rack, mostly theoretically at that. Installation and TestsFirst of all, you should remove four screws to dismount the steel base. Then you should plug all thermal sensors and cables prior to installing a HDD. You don't have to worry about polarity of temperature sensors, and fan headers are designed so that they can be only connected correctly. The channels are numbered from left to right in the following order: CPU, VGA, HDD, CASE. Each cable should be plugged to the corresponding channel. The power cable should also be connected beforehand. Now you can start the installation of your HDD. Put the metal base onto the HDD (onto the surface with chips). Align mounting holes on the metal base and HDD and then secure the HDD with screws in four places. But there is a simpler method. Insert screws into the holes on the bottom of the HDD, but do not tight them. Then put the HDD onto the mounting plate and tight the screws. The trick is not to mix up the horizontal orientation of the base: the flat side of the base must be aligned with the rear panel of the HDD with ATA/SATA and power connectors. 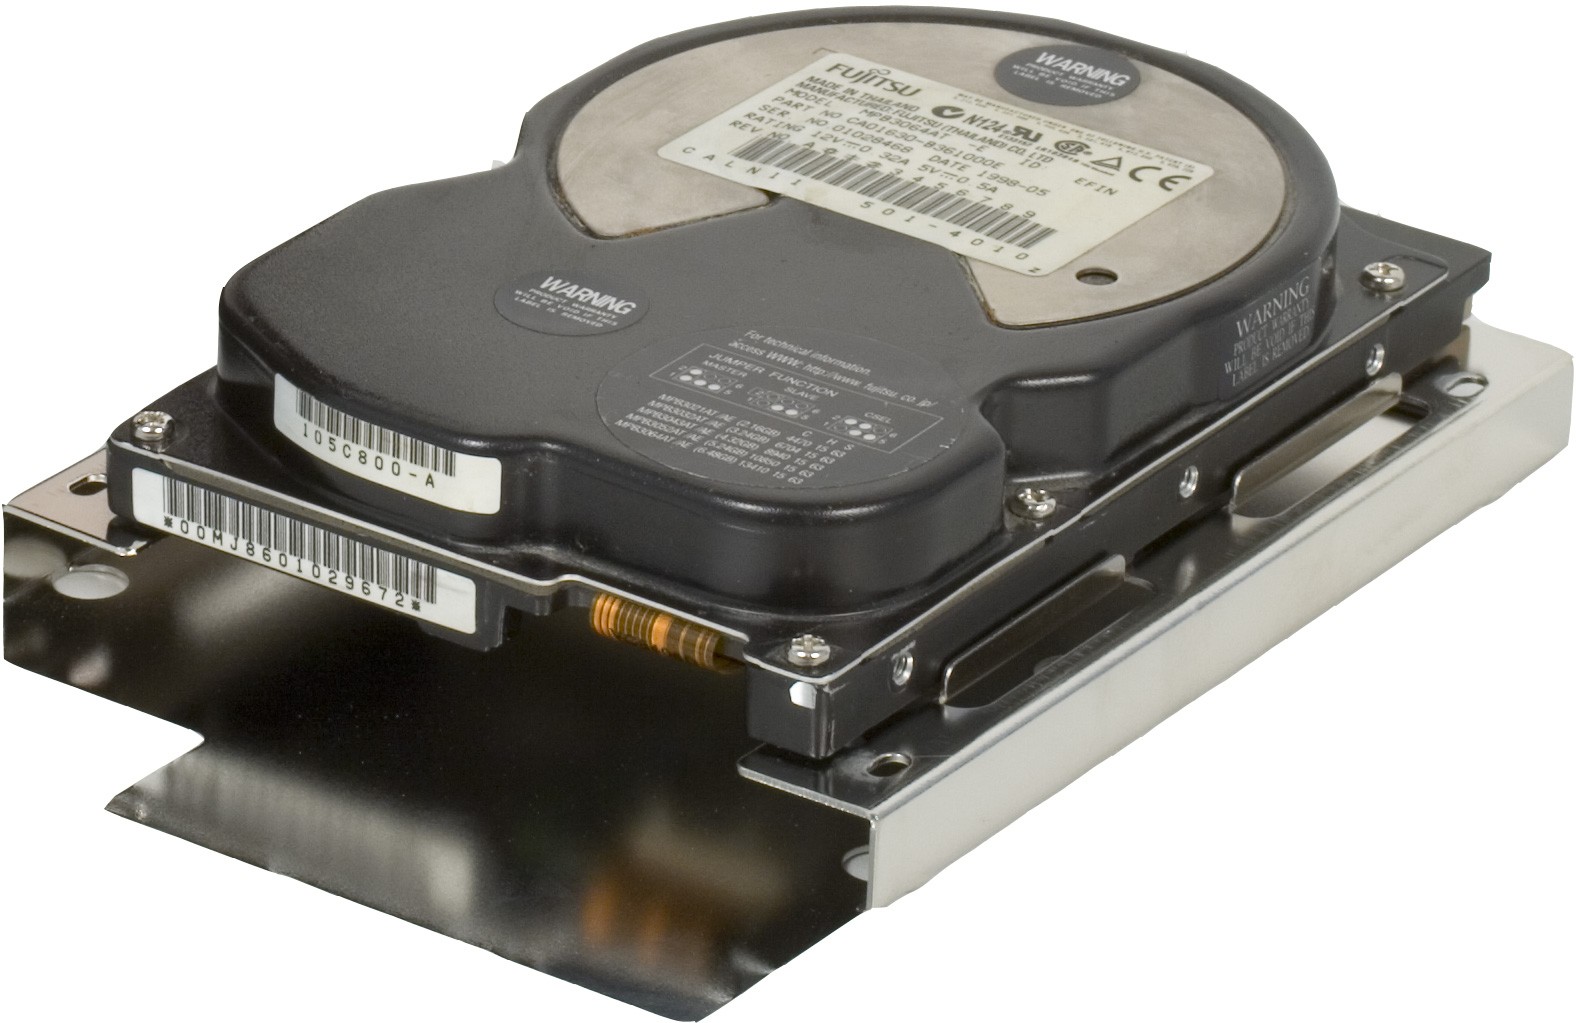 The last step in the installation procedure is to return the mounting platform back into its place and secure it with four screws. You'd better lay the cables to the right and to the left of the HDD. Anyway, it's not easy to do due to lots of wires and little space. The installation is practically completed. You only have to secure CoolDrive 4 in the 5.25'' bay with eight bundled screws or a screwless mounting system of your PC case. All the eight mounting holes in our sample were perfectly aligned with those on the rack, we had no installation problems. As CoolDrive 4 has no rear panel, HDD and power cables are connected directly without any adapters. To power up CoolDrive 4, you should plug a Molex connector to the PSU and connect the other end to the device. It's strange that the manufacturer did not stipulate for a splitter, so you'll have to connect two power cables to the devices: one for the HDD, the other for the device itself. The bundle includes some pieces of scotch-tape to secure temperature sensors. They are reusable, they hold sensors tight enough even on a vertical heatsink. CoolDrive 4 is compatible only with standard 3-pin fans. Adapters to the other connectors, including the 4-pin Molex, are not included into the bundle. The display lights up as soon as you power on a computer, all fans start rotating at 100% speed. Backlight of the dial blinks in a 7-color cycle, the color changes each two seconds. After the seventh color the backlight is switched off for two seconds and then the first color of the cycle lights up again. To choose a backlight color, press the COLOR button once the cycle reaches the color you want. Press this button again to resume the 7-color cycle. You can also choose no backlight at all. Unfortunately, the chosen backlight color (or the lack of backlight) will be reset as soon as you power off the computer. So you will have to waste 2-15 seconds at startup to set up your preferred backlight color, if you don't like the 7-color cycle. We have no gripes with the C/F button. This button toggles the device between the system of temperature units. The selected system will be preserved even after power off. The dial is responsible for several functions, but its main task is to control rotational speed of the fan in the active channel. It copes well with its task, though in a peculiar way. The fact is, you will have to give the dial six complete counter-clockwise turns, to reduce fan voltage from maximum 12.04 V to approximately 7 V. The seventh turn will drop the voltage from 7 V to 0.89 V. Some users may find this solution very good. But in our opinion, six turns are too much for such a small voltage range, two turns for the 12-5V range would have been sufficient. It's not always possible to rotate the dial with a single finger – sometimes the dial feels like being jammed. When you power on the computer for the second time, all fans connected to this device will start rotating at 100% speed irregardless of user settings. Temperature monitoring works fine. Sensors and the metering system are well calibrated. If you put temperature sensors in the same place, they show the same temperature. Reaction to temperature surges (by 50°C and higher) does not exceed two seconds. The device has a built-in speaker to alarm a user about problems. The alarm sounds approximately two times a second, but it's rather quiet. The alarm would be periodically interrupted to be resumed at higher volume. We hope it's the problem of our sample (it seems to live through several testlabs) there are no such problems in production-line devices. Along with a sound alarm, CoolDrive 4 indicates problems by blinking the dial backlight, the color of the backlight automatically switches to red. The device sounds the alarm in the following cases:
You can stop the alarm by pressing the dial. Press and hold the dial to enable Silent Alarm. In this mode, the device will notify you about problems only with blinking backlight. If you press and hold the button the second time, the device will switch to the standard alarm mode. A critical temperature threshold can be specified for each channel. Default values - 55°C for HDD/Case and 65°C for CPU/VGA. To change a temperature threshold of a channel, press and hold the channel button for three seconds. After a short beep, specify the threshold using the dial. If temperature exceeds the threshold, the fan in this channel will automatically start rotating at 100% speed. Custom thresholds are preserved after the computer is switched off. 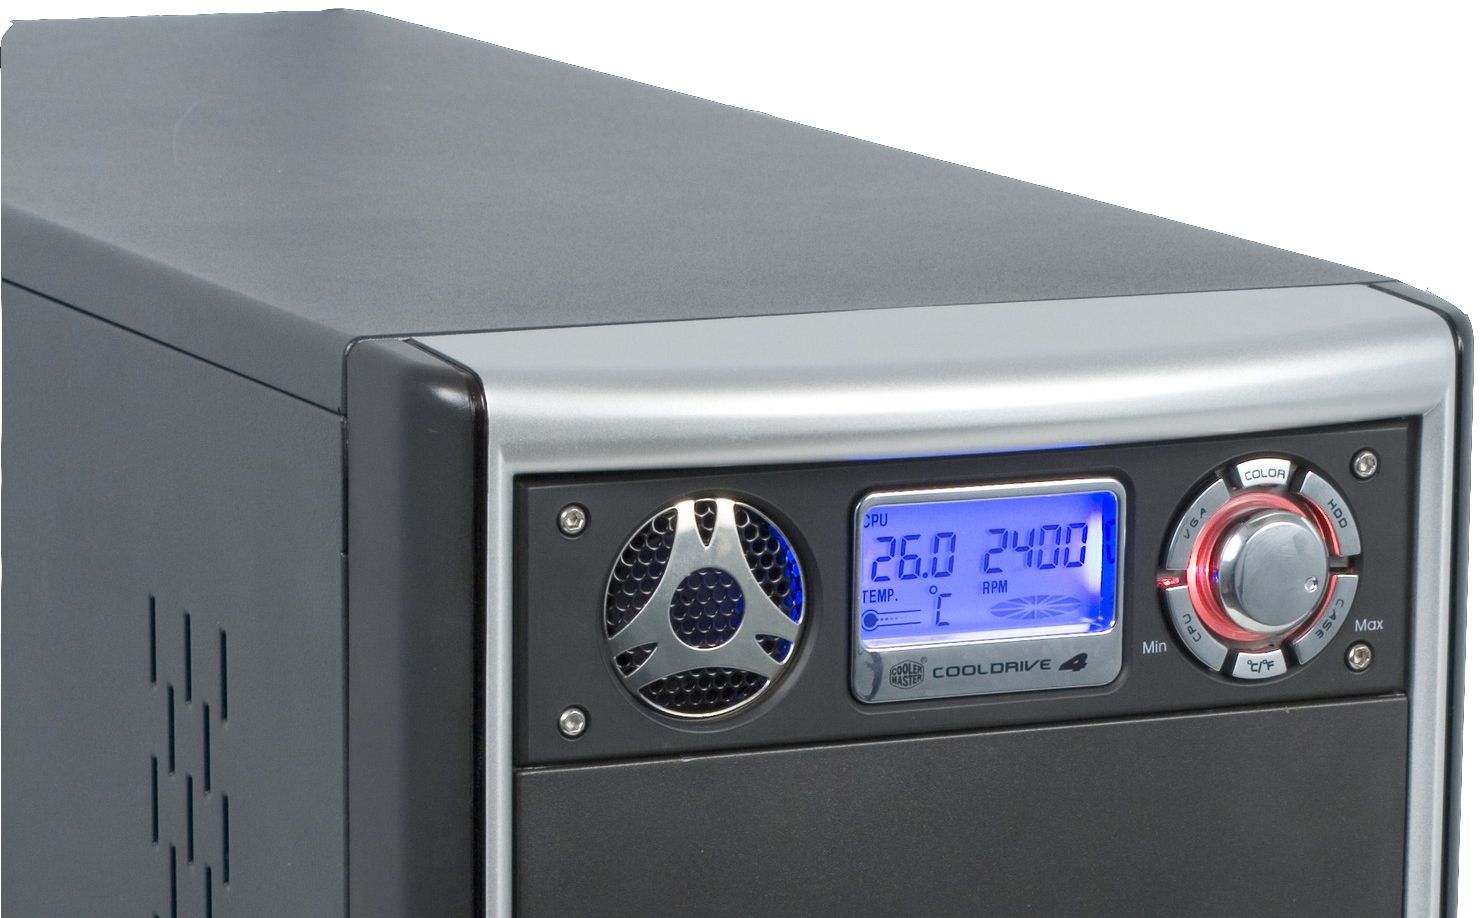 That's all about the monitoring functions of CoolDrive 4. It's time we should test how it copes with its second responsibility – cooling the HDD. Testbed configuration:
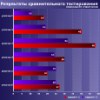
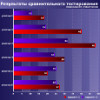
We measured HDD temperature using SpeedFan 4.26. Room temperature inside the testlab was 24°C. Temperature readings were taken after an hour of copying files from one disk partition to another. Comments on the diagram: CASE 12V and CASE 0V stand for fans in a PC case (available/not available), CD 12V and CD 0V stand for activity/inactivity of the CoolDrive 4 fan. According to our test results, CoolDrive 4 cannot provide sufficient cooling for the HDD without fans inside a PC case - HDD temperature exceeds the relatively safe limit of 40°C. The bundled fan is noticeably noisy at maximum speed (approximately 4100 rpm), but the noise is not irritating. Despite its small dimensions, it does not whine like many fans of this size. It gets absolutely quiet at 2000 rpm, but it stops cooling as well. Bottom lineCooler Master designed a really good device that combines attractive exterior and rich functionality. The device has some technical drawbacks, of course, but they are counterbalanced by the advantages of CoolDrive 4 - one of them being a low price for a device with such functionality. Pros
Cons
Some users wrote that their devices preserved a selected backlight color and custom fan speeds after power off. To all appearances, we got a defective sample.
Write a comment below. No registration needed!
|
Platform · Video · Multimedia · Mobile · Other || About us & Privacy policy · Twitter · Facebook Copyright © Byrds Research & Publishing, Ltd., 1997–2011. All rights reserved. |