 |
||
|
||
| ||
If last time we tested an expensive projector named NEC HT1000, this time we have a more universal one - Infocus X1. An attractive price, $1600, and good universality make it suitable both for inexpensive home theaters and for presentations.  The box contentsThe big but light box of a low-key design contains the following:
Each cable (except VGA) wears a tape with color marking and a sticker so that you can quickly find a needed cable and fix the coil. The quality of the cables is not very high. However, the VGA cable is thick, that is why each conductor inside is coated to prevent inteference. On the other hand, it is very rigid (it can be a problem if you have to connect/disconnect it quite often) and takes much more space in the bag. But you can buy cables yourselves, including S-Video and USB cables which are not bundled with the projector. The bag is semirigid, with a shoulder strap and only one big pocket.  Specification
AppearanceThe body is made of grey and silvery-grey plastic. The design is typical of Infocus, but this model has quite a classic shape. Most connectors are placed on the back:  The S-Video has three more connectors due to the following adapter:  this connector combines functions of both an S-Video and a component video-in. Since the connectors are placed below and recessed, it can be difficult to connect the projector to signal sourses. The left side houses power supply connector and switch and a leg release button. On the right you can find only a lamp compartment button and a Kensigton lock connector. In front there is an IR receiver window and the lens. Above are 12 controls and one LED, but there is no a standby button. Also, there is a speaker.  Three large air vents provide for proper air circulation, which must reduce the noise level. The front plastic leg and how it is fixed do not look reliable. The leg is unsteady, and it looks like on the verge of going back inside. It's smooth and roundish undernearth, and the projector can easily glide alone smooth surfaces. Only the rubber back legs help it stand steadily; by the way, the right leg's length can be adjusted: 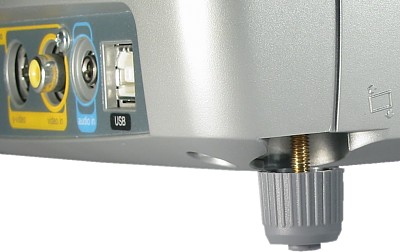 Why not both legs? Remote Control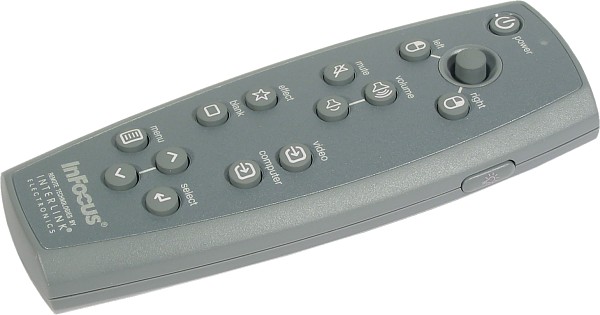 The RC is small and light thanks to AAA batteries. It fits well in the hand though I wish it were narrower in the middle. The buttons are rubber and pleasant by touch. Its design excellently suits for presentations because there are a joystick and two mouse emulation buttons right under the thumb. There are not many buttons, and you can easily find a needed one by touch. With a button on the right you can turn on the red backlight for a couple of seconds:  The effect button can be reprogrammed for one out of eight functions (by default it's used to display additional information), though three of them have separate buttons. In front the RC has two radiating IR LEDs placed at a bit different angles for a wider coverage area.  Since the IR receiver is located on the projector's front panel, the singal gets to it having reflected from the screen in most cases. The connection remains stable until the sum of the distances from the RC to the screen and the screen to the projector exceeds 7 m. In general, the RC leaves a pleasant impression; if it had an integrated laser pointer, it could be considered the best control for a multimedia projector. MenuThe menu is simple, logic and convenient. You can navigate it with 4 buttons; the menu button lets you get in or leave the menu. The up/down arrows will help you move along the menu and adjust parameters, with the select you can get into submenus, choose parameters and go back. The display shows only the current menu. Next to the parameter's name you can see its numerical value. 
 Choosing a signal sourceYou can choose a signal source with the computer button (VGA-in) or by switching between Video 1 (S-Video or component) and Video 2 (composite) with the video button. You can select the source when starting up the projector, as well as select the automated search of active sources. The projector determines a TV signal format itself, but you can disable this option and choose NTSC, PAL or SECAM yourselves. Projection controlBy turning the external focus rim you can adjust focus, and with the lens ring you can zoom in or out. The projector can be considered to be middle-focus, that is why it should be placed in front of the audience, between the people or right after them. At the aspect ratio of 4:3 the lower image edge is lifted by 12% relative to the prjector's axis, i.e. if the the image is 305 cm high it's lifted up by 37 cm. Here are the options influencing the projection:
You can also choose a projection type (front / rear / ceiling). Also it's possible to adjust phase, positions and frequencies for the RGB singal, or let the system do it by pressing the auto image button. Freeze and Zoom commands will be available if you respectively reprogram the effect button on the RC. Image adjustementThe menu has such options as contrast, brightness, saturation, hue (the latter is supported only for NTSC, red-green color balance), sharpness, color temperature (three values) and multiplication for red, blue and green colors. You can save all settings in three preinstalled profiles (Presentation, Film and Video) and three user profiles (User 1-3), and then switch between them from the menu or with the presets button on the projector. Presentation managementThe PC with the Windows 98/ME/2000/XP installed detects the projector connected via USB as a HID compatible device (mouse). You can move the mouse pointer and press its buttons with the joystick and the buttons respectively. The joystick can move the pointer at least at two speeds depending on pressure. A little of practice, and you will be able to make the pointer obey. Additional capabilitiesIn the System menu you can forbid message displaying, enable the NND mode so that the computer connected to the projector via USB never gets into the sleep mode (probably, messages from the mouse or keyboard are emulated), choose what the projector shuold do if there is no signal: go into the powor saving mode (the projector will switch off the lamp in 20 minutes and turn off power in 10 min) or make the screen black (in 5 ... 30 min). The Startup Logo parameter determines whether a logo or a blank screen is shown at the start-up and when a signal is lacking. The color of the blank signal can be specified in the Blank Screen submenu (black, white or blue); you can check it with the button blank on the RC. There is also Factory Reset item to bring all settings to their default values. Brightness characteristics measurementThe light output, contrast and brightness uniformity resolution ere measured according to the ANSI technique. This technique regulates conditions of measurement of some parameters of electronic projectors of the fixed resolution. The ANSI measurement results obtained by different manufactrers can thus be compared. Unfortunately, in most cases they specify only the light output, for example 1500 ANSI lm. Other parameters, especially contrast, are either not specified or measured with other methods. Contrast values can markedly differ from ANSI figures, and therefore, projectors made by different companies can't be compared. We are going to measure three most important parameters which can't be estimated by eye. This is a light output, brightness uniformity and contrast. It's obvious that a light output measured with the brightness set to maximum when black turns into grey, or unbelievable contrast when no grey hues can be seen, is not valuable for users. That is why according to the ANSI methodology the projector's brightness and contrast are adjusted so that test fields can be well discernible (4 darkest and 4 lightest fields with the difference of 5% of the gray scale), and then maintained during the tests.  Gray color for adjustment of brightness and contrast. Brightness of the white area is measured in 9 fixed points to come up with the average one. We'll get the light output if we multiply it by the display area. 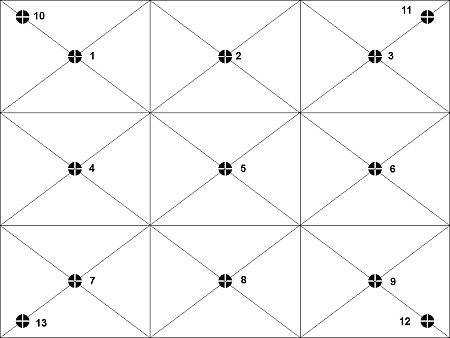 Placement of the luxmeter's sensor for measurement of the light output (1-9) and brightness uniformity (additional points 10-13).
To define how uniform brightness is, we measure it in 4 more points in the corners of the white area and then calculate percentagewise the maximum deviations from the average brightness (obtained when we measured the light output) for all measurements. The contrast was measured on a special test template consisting of white and black rectangles.  Field with alternating black and white rectangles for measuring contrast. Brightness was measured in the center of each rectangle. Contrast was calculated as the ratio of the average brightness of white rectangles to that of the black ones. This contrast is much closer to contrast of real images than the full on/full off contrast, i.e. ratio of brightness of one fixed point of the white area to brightness of the black field. In our measurements we tried to keep to the requirements regarding outside light, luxmeter etc. Thus, we used the TES-1334 luxmeter tested in Rostest and having the required range of measurments and required precision; the outside light was less than 0.01 lux, and the display reflections were brought to minimum. So, here are the results for the Infocus X1:
The light output is acceptable for home and cinema theaters (those sources are correct where the light output is specified to be 1000 lm), but I wish it were greater for presentations which often take place in alight places. The uniformity is satisfactory and the contrast is very good. Audio characteristicsThe speaker is not loud, the sound coming out is far different from the original. If you have no appropriate system at hand, you'd better use a notebook or any PC speakers. The projector is very quiet, - the color filter and fan make some noise but it doesn't attract attention even if there are no other sounds around. VGA connectionThe image quality was tested with the SUMA Platinum Geforce2 MX 400 video card installed in the PC working under the Windows XP Professional, with Monitor Nokia Test v1 and v2 programs. White field: clear bright white color, one of the corners is a little bit darker. The pixel grid is well discernible - probably, this is a peculiarity of the DLP matrix. The black field has sufficient black depth though grey zones can be noticed above and on the right. The geometry suffers because of the image center lifted. There is obvious keystone, i.e. the image widens above, and focusing works well only at the top or bottom of the image. The tests of resolution verified 800 x 600 pixels; the 1-pixel grid demonstrates no moire or noise. The grey scale contains enough hues and has no deviations from grey. The colors are authentic, but intensity is not enough - yellow looks almost brown, and red almost vinous. The chromatic abberations of the lens are more noticeable above, and the color edge on the contrast transitions makes almost 1 pixel. Interpolation from resolutions lower than 800 x 600 pixels is correct. The maximum vertical frequency is 120 Hz at 600x800, 85 Hz at 1024x768 and 60Hz at 1280x1024. Higher resolutions are not supported. Auto image works correctly. Composite and component video signal source testsFor these tests we used Pioneer's top DVD player, European model DV-757Ai (~$1000) with video DACs of 12 bits 108 MHz and progressive scanning. For the component signal we used Supra AV3 cable (~$100/meter, Sweden), 1 meter long. Discs contained high-bitrate DVD movies, a DVD disc (NTSC) with examples of static and dynamic scenes and test tables and VideoCD (PAL, 720x576, MPEG-2, 8 Kbit/s) with original test tables. Although the tested projector belongs to the lower price range, it has an integrated deinterlacing algorithm, i.e. it can convert an interlaced image into a progressive one. There are slight artifacts, and the resolution chart flickers when moves, but the image is stable and the vertical sharpness corresponds to the number of lines in the frame. Unfortunately, a prograssive singal is not supported on the component input. The image quality worsened as we went from one connection to the other: component > S-Video > composite. Although the brightness sharpness makes not less than 540 TV lines in case of any connection, the color temperature goes down: 180 (component), 110 (S-Video) and 95 lines (composite). In case of the composite connection it's possible to reach 120 lines (PAL), S-Video - up to 140 lines of color sharpness. The component connection has no limits, but the DVD record format brings the color sharpness to the half of the brightness one, i.e. up to 270 lines. But these values are not achivable in practice, and the color sharpness obtained can be considered satisfactory. 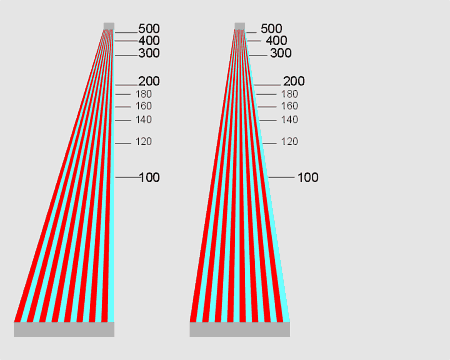 This test table was used to estimate the color resolution. First we determine the border when one of the colors on the resolution chart disappears, and color sharpness is found on the scale on the right. The composite connection doesn't suite for watching video images because of ripples on the screen. The component and S-Video connections look almost identical. In case of the VGA connection the color balance is satisfactory but the color brightness is too low. The TV signal in the SECAM format provides for a stable and correct image, only a small color balance is needed. The cinema theater effect was estimated with several DVD movies of different quality. So, because of too low color brightness we couldn't enjoy the movies especially in case of animated pictures with saturated colors. However, you get used to this peculairity of the projector, and movies where brightness is not that vital, create a certain effect of involvement. However, I want to make the room darker than usual. The only consolation is that the rainbow effect is weaker here, but it can be a result of low brightness of colors. The advantage of the cinema-theater usage is a low noise level and lack of flare light from air vents and other holes. Small digressionWe decided to investigate the picture generation with the DLP technology. Also, we wanted to define the number of sectors on the rotating color filter, because only one sources mentions that they are 4. So, we made a simple circuit, connected a photodiode to its input and the sound card's line-in to its output. This device can register changes in the light intensity in time. Then we fixed the photodiode against the projector's lens and illuminated it with different colors. Here is what we received:  Time dependence of light intensity change for different colors projected. The stripe above indicates the color sector which the light from the projector's lamp goes through at the moment. Different height of peaks on the blue, red and green diagrams can be explained by different sensitivity of the photodiode to different wavelengths. The period makes approximately 8.3 ms. The diagrams demonstrate how the DLP projector forms any color hue with pulse-duration modulation of the matrix of micromirrors and periodical change of the color filters. The projector obviously has a 4-segment color filter (white, red, green and blue). White can be formed both with RGB segments (white-RGB diagram), and with all 4 segments (white-WRGB). Brightness in the latter case is a tad higher. The filter rotates at 120 rpm at the vertical frequency of the input RGB signal of 60 Hz. We didn't have time to find out whether it changes with other parameters. The colors are not very intensive probably because of the too thick filter in comparison with the lamp's brightness (or, on the contrary, because of too low lamp's brightness :)), since the pulses which correspond to the basic colors are overlapped, and it means that the light goes through the color filter during the whole segment. Probably, the developers shouldn't have used the 4-segment color filter - in that case they would reduce brightness of the white area but increase it of the color image. ConclusionThe impression of this projector is complicated. It has some disadvantages, but it's necessary to account for its price. Well, let's see what this projector suits more: presentations or movies. Presentations:Pros:
Cons:
Movies:Pros:
Cons:
In general, the projector suits both types of application with some reservations. So, if you need a universal multimedia projector for a moderate price, have a look at this one. There are two more positive points: an ergonimoc design of the remote control and of the projector itself of a single style, and a comprehensive, user-friendly menu. Write a comment below. No registration needed!
|
Platform · Video · Multimedia · Mobile · Other || About us & Privacy policy · Twitter · Facebook Copyright © Byrds Research & Publishing, Ltd., 1997–2011. All rights reserved. |