 |
||
|
||
| ||
 Package ContentsThis projector appeared in our lab with an incomplete bundle, so we'll list the package content judging from the manual:

The case contains one section for the projector and an external pocket. The latter obviously cannot accommodate all the accessories, so you'll have to put into the pocket only bare necessities, the remaining accessories will have to be kept elsewhere. Note the unusual variety of cables, especially that the projector comes shipped with the mini D-sub 15 pin to 3 RCA adapter, which is used to connect a projector to component signal sources. Specification
DesignBenQ designers have made a good concept of it: retaining some ovality, this projector looks aggressively purposeful. This effect is achieved by the use of a lens housing made of radically black plastic sort of embedded into the silver case, as well as by the recessed large diameter lens with a circular ledge like a lens hood resembling an all-seeing eye of a security video camera. Perimeter of the projector is made of black plastic, the top and bottom are made of aluminium-magnesium alloy. High thermal conductivity of the latter contributes to the additional passive cooling of the projector. The black plastic insert (part of the lens housing) on the top panel hosts a loud speaker screen, 3 indicators (three-color LEDs indicating 17(!) events), cross-shaped four-position button and 4 separate little buttons.  All the connectors (except for a kensington lock hole, which is on the right side) are located on the left part of the rear panel. 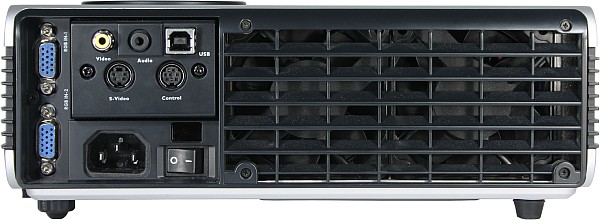 The power button and an Infra-Red receiver are also located there. The second IR receiver is on the front panel next to the lens. You can regulate the height of the rear left foot within small limits to level the projector on uneven surfaces. When necessary the front part of the projector can be elevated on the plastic foot located in the fore part of the projector in the middle. An elastic string tethers the lens cap to the projector. Three mounting holes in the bottom of the projector allow to fix it to a bracket. There are two obvious errors in the construction of this projector: firstly, rear panel connectors protrude out of the case dimensions, so the risk of damaging them is higher, 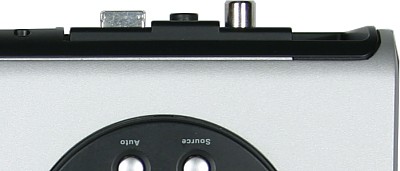 and, secondly, the connectors are too densely placed, so it's difficult to connect the projector to several signal sources. And the cables screen the rear IR receiver window and the power button. Also note that dust specks stand out against the black plastic, while the high ribbing of the case makes it hard to clean. Remote control
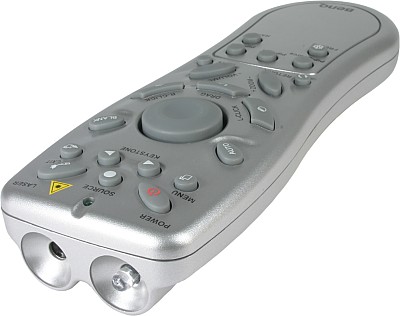 The remote control looks somewhat futuristic. Fortunately it does not harm its functionality. It is convenient to hold, necessary buttons are easy to find by touch. The four little buttons in the second row from top are used to navigate the menu, while the joystick is not used for some reason. It's used to control the mouse cursor instead (you only need to connect the projector to a computer with an USB cable). Buttons at the sides of the joystick emulate left and right mouse button clicks, and a press on the DRAG button emulates holding down the left mouse button – it's easier to perform drag-and-drop operations using the remote control. There are no buttons to navigate a slide show, so to return to a previous slide (to go to the next slide, you should click the left mouse button), you will have to call up the context menu and choose the previous slide option. The remote control has a built-in laser pointer. It's turned on with the upper right LASER button. The buttons are made of rubber-like plastic, no backlight. 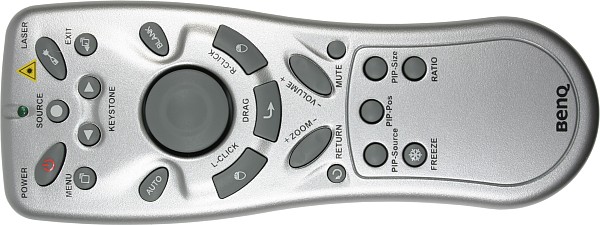 MenuThe screen menu consists of 5 tabbed pages plus several additional pages. The icons on the tabs are not self explanatory and it's hard to predict what settings will be on a given tabbed page. Menu navigation is strange and inconvenient: the left and right buttons are used to select pages and change settings, and the MENU button is used to switch among parameters. When you change any parameter, the menu stays on screen blocking its considerable part, which hampers your evaluation of the changes made. Users can set the position of the menu on screen as well as the time the menu stays on screen after the last key press. The menu is not localized. 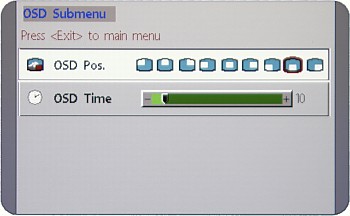 Switching4 video inputs: composite, S-Video, and a couple of VGA-inputs (mini D-sub 15 pin).  Only the second VGA-input (RGB IN-2) is compatible with component video signal sources (the appropriate adapter is included into the bundle). The Source button on the remote control or on the projector is used to switch among video inputs. Searching for an active source is enabled by default. A 3.5 mm mini jack is used to connect to audio sources. The mini jack to mini jack cable comes shipped with the projector. Besides, there is a mini jack to 2 RCA adapter allowing to connect to audio sources with RCA connectors. The projector can be controlled via the RS232 interface, but the mini DIN 8 pin to D-sub 9 pin cable is not included into the bundle, and the manual contains neither instruction formats nor protocol settings. Controlling projectionFocus can be adjusted manually by rotating a wide silver ring on the lens, the image can be zoomed using a lever on the lens.  Both controls are accessible through a cutout in the lens housing. The lens' position relative to the matrix is such that the bottom edge of the image is a tad higher than the lens axis (approximately by 1/8 of the image height). You can adjust the keystone using the left-right buttons on the remote control or on the projector (when they are not used to navigate the menu) or via the screen menu. There are only two aspect ratios: 4:3 (the image is stretched full screen) and 16:9 (the image shrinks vertically to reach the 16:9 ratio, it's used for anamorphosed movies). Another thing – you can switch off interpolation to the matrix resolution with an active VGA connection. The RATIO button on the remote control is used to choose an aspect ratio you need. The ZOOM swing lever controls digital zooming (up to x4). When you press FREEZE, the image freezes. You can temporarily switch off projecting using the BLANK button on the remote control. We should separately mention the picture-in-picture function. You can display a picture from a composite or S-Video-input over the main image from an active VGA-connection. 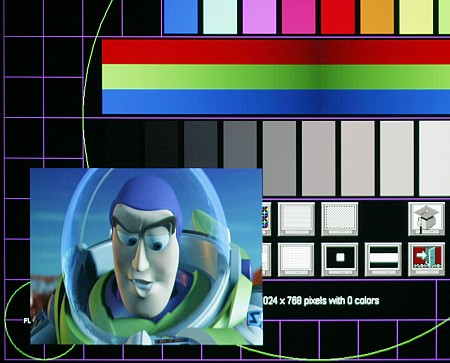 Using the remote control buttons (PIP Source, PIP Pos. and PIP Size) and the separate menu page (the last tab-sheet) you can change the source, size, and position of the second image, 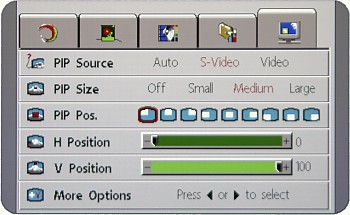 as well as control its brightness, contrast, saturation, tint, and sharpness. 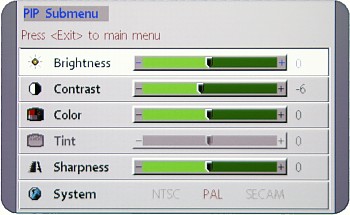 In the menu you choose a projection type (ceiling / desktop mount; rear screen / front screen projection – one of the four ambiguous icons in the Mirror menu item). 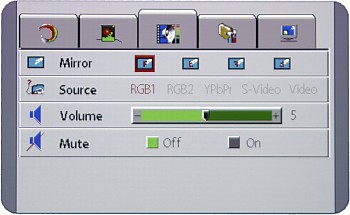 By default the projector remembers the mirror and keystone correction values, but you can disable the corresponding triggers (Mirror Hold and Keystone Hold), and then the projector will always be configured for front screen projection from desktop without keystone correction at startup. It's a short-throw projector, so in case of the front screen projection the unit should be positioned in the first row of the spectators or right behind them. Adjusting the imageIrrespective of the source and type of the video signal you can always adjust brightness, contrast, and color temperature. 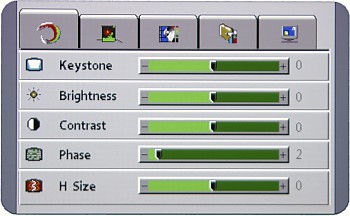
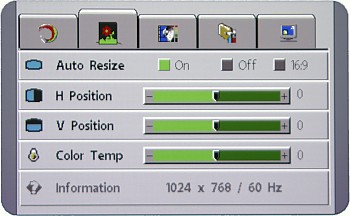 Saturation can be adjusted only for composite, S-Video and component connections, sharpness – only for composite and S-Video connections, and tint – only for NTSC-video signal. There are no preset and custom profiles. Image adjustments are remembered for every connection type. Brightness can be reduced by enabling Economic Mode. 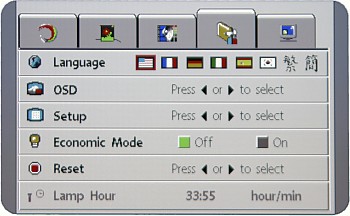 Extra featuresThis projector is not oversaturated with extra features. We can only note the blank time, which determines the length of time before the projector is shut off when BLANK is activated or when there is no signal. 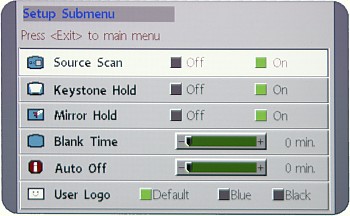 Measuring brightness characteristicsBrightness, contrast, and illuminance uniformity were measured according to the ANSI technique, which is described in detail here. BenQ PB7220 results:
The brightness is considerably lower than 2500 lm claimed in the specification. In idea, the lamp shouldn't have run down so heavily for 34 operating hours. Probably we either got a defective sample, or the specification value was deliberately increased to raise its competitiveness, or BenQ departs from the ANSI brightness measuring technique. Screen illumination is very uneven. It reaches 3710 lux in the center (image size – 93 x 70 cm) and gradually decreases to about 1700 and 2200 lux in upper and lower corners respectively. Contrast is more than sufficient for slide shows but it's lower than average among DLP projectors. Audio characteristicsThe noise from fans and the rotating color wheel is small, and the projector is very quiet at economic mode. There are no irritating harmonics. Built-in speaker is rather loud, and sound distortions are weak at average volume. Speaker volume is controlled with the VOLUME button on the remote control or via the screen menu. You can mute the sound in the same way or using the MUTE button or a corresponding trigger in the menu. VGA-connectionThe white field subjectively looks a tad uneven in brightness but without color patterns. The black field is also slightly uneven, light-gray glares being scattered all over the screen (even beyond the projection boundaries). Geometry is ideal. Pixel grids are contrasty, without artifacts. It's impossible to obtain perfect focus all over the screen – the image will still be slightly blurred in some place (less than 1/2 pixel). The grayscale is distinctive along the entire range, but the darker sections feature video noise and the color temperature uniformity leaves much to be desired – the gray color sometimes tints lilac or greenish. The color balance is quite correct, but the colors are dim, desaturated. That is even the pure colors contain a gray component. The width of a colored stripe at object borders due to lens chromatism does not exceed 1/2 pixel. The auto image adjustment function for the VGA input is not always correct. Sometimes you have to display a "convenient" image with contrasty borders and then start the auto image adjustment function manually – only then the parameters will be detected correctly. Working with composite and component video input
The image clearness is good, especially with the component connection. You can make out details both in light image areas and in dark ones. But to obtain this clearness, you have to manually adjust brightness and contrast for each connection type. Deinterlacing is based on a simple algorithm – image jitter is eliminated using vertical blur, which results in the compromised vertical clearness on the one hand and in the lack of comb like artifacts on the other hand. You can make out artifacts in the form of vertical lines (especially when there is horizontal movement in the frame), which are probably caused by some mistakes of the interpolation algorithm. The colors are dim, there is a "rainbow" effect. ConclusionsBenQ PB7220 is a compact-sized and bright projector designed for slide shows. We want to note a convenient multi-functional remote control. Unfortunately, the four-segment color wheel as well as some shortcomings in its construction and in the image processing procedures do not allow to classify this projector as universal. That is it won't do for a home theatre. Pros:
Cons:
BenQ PB7220 projector has been kindly provided by BenQ www.benq.com. Alexei Kudriavtsev (kalexk@ixbt.com) 23.10.2004
Write a comment below. No registration needed!
|
Platform · Video · Multimedia · Mobile · Other || About us & Privacy policy · Twitter · Facebook Copyright © Byrds Research & Publishing, Ltd., 1997–2011. All rights reserved. | |||||||||||||||||||||||||||||||||||||||||||||||||||||||||||||||||||||||||||||||||||||||||||||||||||||||||||||||||||||