 |
||
|
||
| ||
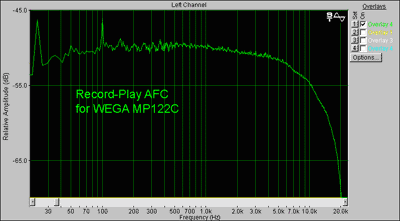
IntroductionToday we will talk about the practice of digital sound recording. It's obvious that some day an owner of a PC will come to do it. However the process is not simple and you have to acquire some skill and experience to reach maximum quality. Here we want to give you (especially if you have the SB Live!) some recommendations which are not properly described in the papers or on the Net, in order to prevent problems connected with sound recording (such as noise and pickups). I should note that all you will read here is a result of generalization of the experience of many people, but it still mustn't be taken for gospel. General remarksThe following sources are used most often for digital reording: Vinyl recordsA good turntable and a preamp-corrector are of vital importance here. We write a record to a computer, remove clicks, filter infra-sound lower 16 Hz (to remove roar) and distinguish songs. Since 65-70 dB noise on the output of a player is not significant, you'd better not clean it up. And as for a background (unpleasant low-frequency tone in 50, 100, 150 etc. Hz) you better check before sampling - check the ground, terminals inside the player. MicrophoneI mean a good mic and a microphone amplifier. You can read a lot on the Net, I want give you just one piece of advice. Many of you already know much about signal twisted-pair cables, but how to solder cables on the ends.... The picture show how to make a cable which won't influence the record quality (if it consists of qualitative cables). A copper braid serves a screen (it's desired that the copper be used everywhere!). Signal threads inside the screen are a twisted pair of copper multithread cables. I recommend you to buy such cable in a specialty store. Note that you should pay such careful attention to a cable only in the case of the mic, otherwise you will have to change mics and mic amps infinite times.  The principle is: The screen is connected to a metallic base of the cap (if it's metallic) or just hangs inside a microphone case, and on input (only!) the screen is connected to the ground. In this case noise and pickup flow down into one place and do not circulate around the screen. The screen mustn't be "an antenna for the noise"! In case of an electric guitar the principle is the same! Connect a screen of a circuit diagram (make it out of tin or foil) inside the guitar to the screen, and then connect cards or attachments with the ground on the input. Don't play the guitar near your system block - better make a longer cable. Do not damage studio facilities! Just check how the connectors are unsoldered. A mic with a professional connector CANON has usually the ground on a pin 3 (otherwise, make sure asking the salesman) Cables of the microphone amplifier/processor/tape-recorder are to be soldered according to the same principle (a screen are to be connected to the ground on the input), there is added one more thread of the second stereo channel. Note that you better ground the system block. I think you would agree that a competently created cable is not that bad as compared with the Monster Cable or the Vampire; though if your 6-channel DSP-amplifier costs $1000 - better buy a decent cable. The microphone record needs only a frequency correction (if the AFC of the microphone has a noticeable unevenness and a fall before 18-19 KHz). As for a compact-cassette, it's not so simple. The record and artefact removal is a real art there. The matter is that a compact-cassette has a limit by 300 playbacks. After that the information can disappear, sound can get vague and broken. On the one hand, a CD with polished MP3 files is better than to mess up with a cassette since you need to clean a track with spirit, not mentioning the head. On the other hand, a restored phonogram from a decent quality cassette will offer much more details and warmness as compared with many 128 Kbit MP3-files. RestorationFirst of all, you should know that if your device gives out audio data only in the range of 40-14000 Hz on a Ferro-cassette, in any case it reproduces higher frequency (up to 20-21000 Hz) but they do not correspond to the Standards and are weakened and drowned in noise. This is exactly what we are going to correct. 1. AFC approximationPractically on any standard cassette (TDK D etc.) or an expensive one the audio record lies practically equal. If do not have the TEAC at $900 or the Nakamichi Dragon, then it doesn't matter - the AIWA or the VEGA. On such devices the quality of the reproducing signal mainly depends on the properties of the tape and less on the reproducible track. The magnetic tape on ferro cassettes won't allow the frequencies higher than 14,000 Hz, and the others will be strongly weakened. Here you can see the AFC for the track "record-play" of the tape-recorder VEGA:  Track "record-play" depends on a tape-recorder. In order to carry out an investigation of the tract (and for the following mastering) you will need the last versions of the following programs (or at least their demo-versions):
You can also use external denoisers such as the Sonic Foundry Noise Reduction 2.0, Arboretum Restoration-NR etc., though I prefer an integrated Cool Edit Pro (as well for the filtering). Note that a commercial version of the Cool Edit (Cool Edit Pro 1.2) greatly differs from its free brother (Cool Edit 2000). For example, the Cool Edit 2000 doesn't have a function Preview, Multitrack-mode etc. Nevertheless, all necessary for our problems to be solved are included in the both versions of the Cool Edit. The procedure of track researching should be the following:
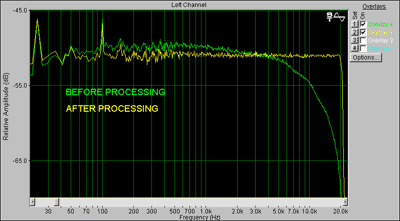
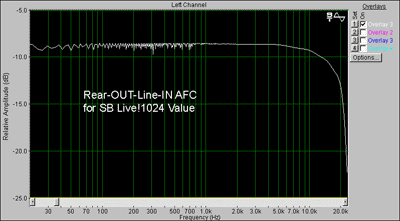
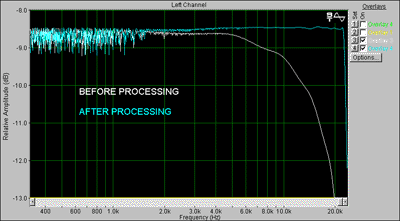
* The pink noise is preferable since it's closer to the music signal in its properties. The Record_play tracks for good devices are very close, and you can use my results for the AFC correction of the VEGA-122C tape-recorder. So, in the file C:\Windows\cool.ini find a partition [Filters96] and record the following in the free line (one line!): Item29=RESTORATION,3,19,0,20,426,5,845,0,1288,0,1986,0,2259,0,2855,6,3179,9,3444, 21,3583,28,3688,42,3773,48,3848,61,3925,76,3957,96,3998,100,4004,100,4012,5,4096,5, 19,0,20,426,5,845,0,1288,0,1986,0,2259,0,2855,6,3179,9,3444,21,3583,28,3688,42,3773, 48,3848,61,3925,76,3957,96,3998,100,4004,100,4012,5,4096,5,2,0,12000,1,2,0,0,1000, 100,5,-10,100,-0.5,12,24000,1,0,1,1,48000 Now in the Transform/Filters…/FFT Filter (in the Cool Edit) find the preset RESTORATION and correct the phonogram. That's all. It took me two days to get the value +/-0,5 dB from 10 to 19500 Hz for the AFC of my VEGA. Enjoy it! The AFC of the VEGA-122C before (the green line) and after (yellow line) the frequency correction:  Besides, all of you know that the AFC of the sound card itself and moreover of the external ring Line-Out-Line-In also has a definite slump in the high frequency range, and it's usually the ADC to blaim in the greater degree than the more or less linear DAC. The sampling is wan, lacking clarity and lightness in the high register. You have to solve this problem before processing the recorded material; we'll talk about it later. 2. For the SB Live! owners.Many owners of the SB Live!1024 Value knew that the AFC of the codec SigmaTel STAC9721 is not ideal and after 4.5 KHz there starts a stepping decline:  The main contribution is brought in by the ADC of the codec. This was done in order to prevent penetration of parasitic harmonics into the audible spectrum part. On the other hand, such a cut of highs has negative consequences: with the good Hi-Fi devices it can be noticeable. That's why I would recommend to all SB Live! owners first (before the following processing) to pass every phonogram, recorded through the Line-IN, through the next filter (the same cool.ini and the same partition): Item36=CORRECtion,3,20,0,0,83,0,532,1,793,1,1003,2,1223,4,1713,5,2046,10,2391, 12,2569,15,2710,18,3066,24,3234,27,3398,35,3480,41,3546,47,3628,56,3726,70,3825, 89,4096,100,20,0,0,83,0,532,1,793,1,1003,2,1223,4,1713,5,2046,10,2391,12,2569,15, 2710,18,3066,24,3234,27,3398,35,3480,41,3546,47,3628,56,3726,70,3825,89,4096,100, 2,0,12000,1,2,0,0,1000,100,3,-10,100,0,14,24000,1,0,0,1,48000 After such operation the unevenness of the AFC in the ring LineOUT - LineIN for the SB Live! sound card was reduced to +/-0,1 dB! The AFC of the SBLive sound card (the STAC9721 codec) before and after the frequency correction. The scale of the graph is 5 dB!:  Now we have the "reference" linear input! Enjoy... If you have the MD-52A mic (professional, 20-16000 Hz) I'd recommend the following correction line: Item40=MIC_MD52A,3,8,0,0,1723,17,2158,37,2569,53,3176,89,3316,100,3480,100,4096, 100,11,0,50,4,51,5,60,6,73,8,81,10,85,14,87,17,79,19,60,24,51,4096,50,2,1,6000,1,4, 0,0,648,31,831,57,1000,100,3,0,100,0,16,24000,2,1,0,1,48000 3. Noise eliminationI think that the Noise Reduction in the Cool Edit is the best. Sound producers praise the Arboretum Ionizer since it doesn't bring in phase artefacts in the processed material, my friends advise the Sonic Foundry Noise Reduction. Besides, there is a not bad restoration program DART Pro but we are not going to compare all them in this article. So, after quite stressful filtering you should take 1.5-1.6 second noise before each or just any song (but only from the same side of the cassette where you have taken the phonogram from). Further:
Precision Factor = 12 (for maximalists
it will be 14, for the Preview - 8). The parameter defines the
precision of measurements; Often it's necessary to renormalize phonograms for -0,2 dB (this is the standard for CD-Audio), since the noise reduction can tremendously cut down the signal energy. Now everything is ready for MP3-encoding! However, they say that normalization before compression in MP3 is very harmful, and you should do it only in case of noticeable difference between the levels of separate channels or just in case of a weak (-3…-6 dB) level of the phonogram. This is the case when it's for you to decide. 4. CompressionAs for me, I'm using a coder Fraunhofer IIS integrated in the BPM Studio Pro 3.0. In my opinion, other coders from the Fraunhofer IIS can't avoid a peculiar rustle in the received file, and at all bitrates. Besides, I take carefully the LAME -f, I think that it is good only on the AFC. Now what concerns a bitrate. Frankly speaking, all nuances remain only at 256 Kbit/s, though at 192 Kbit/s the phonogram doesn't differ much from the initial one. In order to choose the best bitrate for a certain phonogram, first I encode a fragment which is rich of high frequencies or with some familiar nuances) into all bitrates: 128, 160, 192, 224, 256. Then in the Sound Forge I connect the original fragment with the encoded one and listen. Usually the real fight occurs between 192 and 256 kbps. For the restored phonograms 192 kbps is quite enough, though some need even more than 256 kbps. Besides, tape recording is quite difficult material for encoding. So, you can trust devices and spectrograms, but you better make a control hearing. Nevertheless, this concerns mainly the owners of a decent track anplifier-speakers (headphones). ConclusionSo, with enough urge towards getting maximum from
what you have at your disposal, you may reach quite decent quality
of record from any source. Do not just sit with what you have got
from sound card manufacturers - but seek, study and demand the Sound.
Write a comment below. No registration needed!
|
Platform · Video · Multimedia · Mobile · Other || About us & Privacy policy · Twitter · Facebook Copyright © Byrds Research & Publishing, Ltd., 1997–2011. All rights reserved. |