|
||
|
||
| ||
|
||
|
||
| ||
Part II |
|
Tweet | ||
[ Back to Part I ]

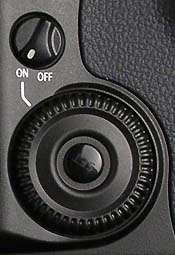
In this article I'm going to tell you about the key principles of the controls of Canon EOS D30. The camera is a typical model of the EOS series. Modes can be chosen by turning a dial, one half of which is meant for advanced users (it's called "a creative zone"), the other half is intended for beginners (it's called "an easy shooting zone"). In the middle there is a "green zone" where the camera works in a full auto mode. The creative zone includes the following modes: Program Auto Exposition (P), Shutter Speed Priority AE (Tv), Aperture Priority AE (Av), Manual Exposure (M) and Auto Depth of Field Priority AE (A-DEP). In these modes two proprietary wheels allow to adjust the shooting parameters.
One of the wheels suits the forefinger, the other is meant for the thumb.
In Manual mode (M) the wheel for a forefinger allows to set the exposure, and the other is meant for the aperture.
In Aperture Priority AE mode (Av) the forefinger wheel changes the aperture, and the other one the exposure correction.
The latter is possible only after pressing halfway the release button, i.e. after the camera has set an exposure. The functioning of the thumb wheel can be disabled with a special switch.
In Shutter Speed Priority AE mode (Tv) the situation is the same as in the previous mode, except for that the forefinger wheel is used to set the exposure.
In Program Auto Exposition mode (P) with the forefinger wheel you can choose among pairs "exposure-aperture" which provide an exposure recommended by the camera. The other wheel is for the exposure correction.
In the last mode, auto depth-of-field priority AE mode (A-DEP) the camera tries to set the aperture so that different objects located at different distances from the camera and meant for different focusing points were sharp.
The green zone is a full automatic mode, which allows for no user interferences.
The modes included in the "easy shooting zone" are Portrait, Landscape, Close-up, Sports, Night Scene - no user interferences are allowed.
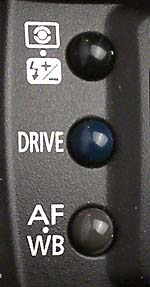
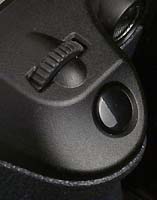
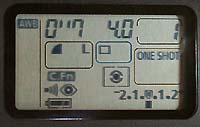
On the upper side of the camera there are 3 buttons. The first is meant for exposure metering zones. On pressing this button all the information disappears from the LCD display , there is only a sign showing a way of exposure metering. After that, turning the wheel with a forefinger you can choose among a central-weighted, integral and spot metering. When rotating the wheel with your thumb you can correct the power of the impulse of a built-in or external matched flash.
The DRIVE button lets you choose among a single shot, a serial shooting or a shooting-on-timer. You can switch to these modes with either wheel. The third button, AF-WB, lets us choose between an auto focusing for stationary objects and follow-up focusing for moving objects. In the first case the focusing is made right after pressing halfway the release button, in the second case it is implemented continuously until you release this button.
Rotating the thumb wheel you can adjust the white balance choosing among incandescent lamps, sunlight, flash etc. Besides, the camera has got an additional button for a visual control of a depth-of-field.
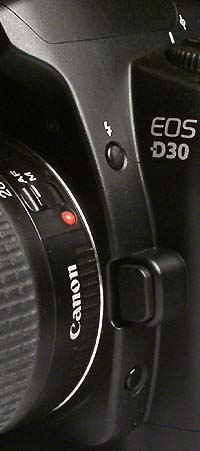
When pressing this button the aperture of auto lenses is set to the working value (the lower button in the photo). And looking in the optical viewfinder you can visually control which objects are sharp.

On the rear panel there is a button for choosing a focusing point, and a button with an asterisk for functions set by a user. These 2 buttons are intended for a thumb. The information on the parameters you have set is displayed on a LCD display on the upper panel of the camera, as well as in the illuminated line seen in the optical viewfinder.
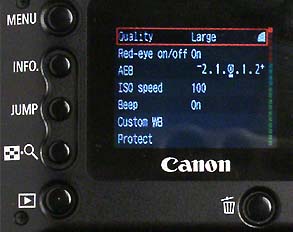
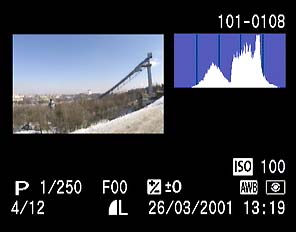
The LCD screen and buttons around it concern the digital part of the camera. These buttons are "menu"," info"," jump", "enlarge", "playback", "delete". On pressing the menu button a list of adjusted parameters appears on the screen. You can navigate along the menu with a thumb wheel and make a choice with a button in the center of the wheel. The set of functions is standard: quality, compression, red-eye reduction, exposure bracketing, exposure index, sound signals, white balance, locking, rotation, print order, auto playback, sleep down time, viewing of captured shots, time of viewing shots, LCD brightness, date, time, file numeration, language, video system, memory card formatting and user's functions. Let's consider the last menu item in detail. It includes the following functions: noise elimination in case of a long exposure; distribution of functions among the release button and the user's button marked with an asterisk; fixation of the mirror in a lifted position; choice of exposure and aperture increments; switching on/off the auto focus backlight; shutter speed in the aperture priority mode when shooting with a flash; exposure bracketing functions; 1st and 2nd curtain sync function; reaction of an auto focusing system on a halfway pressing of the release button; automatic restriction of a flash power; menu position on opening; user's functions for the "set" button located in the center of the parameter choice wheel, matrix clean-up mode (in this mode the mirror is lifted up, the shutter opens and you can blow off the dust from the matrix). Among the other buttons the "info" one should be paid attention to as well: it allows not only to see the shooting parameters but also histograms of brightness and pixels, plus, too light or too dark parts of the shot where details can't be distinguished are marked.
The camera can be controlled with a remote control and with a computer. Now let's turn to the remote control.
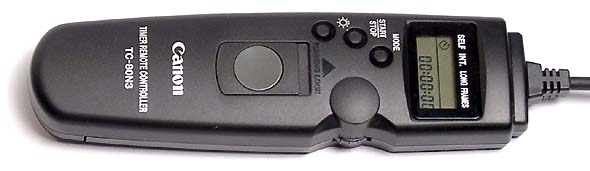
The remote control TC-80N3 is intended for controlling film cameras EOS 3 and EOS 1V. I have already written about the policy of Canon towards the connectors for connecting a remote control to a camera in the previous part. The remote control can be used as a primitive cable if you want to avoid the shaking of the camera at long exposures. The remote control's button has two positions; half pressing - full pressing, and it can be fixed in a pressed position. The remote control has its own LCD display with a backlight and a built-in timer used to set a period between shots, exposure time and the number of shots to be done.
| Sensing element | |
| Type | CMOS |
| Size | 22.7 X 15.1 mm |
| Number of pixels | 3.25 million (2226 X 1460) |
| Number of effective pixels | 3.11 million (2160 X 1440) |
| Filters | RGB; a nonremovable filter located in front of the matrix surface and letting pass only the visible spectrum |
| LCD display | |
| Type | TFT |
| Size | 1.8" |
| Number of pixels | 114 000 |
| Brightness adjustment | 2 values: standard and increased brightness |
| Recording technique | |
| Memory cards | CF type 1 and 2 |
| Recording format | JPEG and RAW |
| Auto focus | TTL |
| Number of focusing points | 3 |
| Choice of focusing points | Automatic and manual |
| Focusing modes | One-shot AF - the shutter
works only if an object is in the focus. AI servo AF - an auto focusing system tracks movements of an object. AI focus AF - auto switching between the first and the second modes (only in the auto mode). Manual focusing |
| White balance | Automatic and manual |
| Viewfinder | Pentaprism + eyepiece with dioptric correction |
| Visible part of the shot | 95% |
| Exposure control | 35-zone exposure metering |
| Measurement range | EV2 - EV20 |
| Exposure index (ISO) | 100, 200, 400, 800, 1600 |
| Exposure compensation | +- two values |
| Shutter | Focal with vertical moving of curtains |
| Shutter speed | 1/4000 s - 30 s. Synchronization with electronic flashes at 1/200 s exposure |
| Timer | 10-sec fixed duration |
| Shooting modes | Single shots, serial shooting (approx 3 frames per sec, max. 8 fps), shooting-on-timer |
| Built-in flash | |
| Type | E-TTL |
| Leading figure | 12 |
| Charging time | 3 s |
| Power supply | BP 511 rechargeable batteries |
| Battery for storing of chosen parameters | CR 2025 |
| Connectors | |
| Flash connection | Connector for X-synchronization and a connector for TTL-synchronization |
| Remote control | Connector of N3 type |
| Computer connection | USB connector |
| Video-out | NTSC/PAL |
| Dimensions | 149.5 X 106.5 X 75 mm |
| Weight | 780 g |
Write a comment below. No registration needed!
|
Article navigation: |
| blog comments powered by Disqus |
| Most Popular Reviews | More RSS |
 |
Comparing old, cheap solutions from AMD with new, budget offerings from Intel.
February 1, 2013 · Processor Roundups |
 |
Inno3D GeForce GTX 670 iChill, Inno3D GeForce GTX 660 Ti Graphics Cards A couple of mid-range adapters with original cooling systems.
January 30, 2013 · Video cards: NVIDIA GPUs |
 |
Creative Sound Blaster X-Fi Surround 5.1 An external X-Fi solution in tests.
September 9, 2008 · Sound Cards |
 |
The first worthwhile Piledriver CPU.
September 11, 2012 · Processors: AMD |
 |
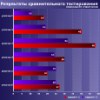
Consumed Power, Energy Consumption: Ivy Bridge vs. Sandy Bridge Trying out the new method.
September 18, 2012 · Processors: Intel |
| Latest Reviews | More RSS |
 |
Retested all graphics cards with the new drivers.
Oct 18, 2013 · 3Digests
|
|
Added new benchmarks: BioShock Infinite and Metro: Last Light.
Sep 06, 2013 · 3Digests
|
|
Added the test results of NVIDIA GeForce GTX 760 and AMD Radeon HD 7730.
Aug 05, 2013 · 3Digests
|
 |
Gainward GeForce GTX 650 Ti BOOST 2GB Golden Sample Graphics Card An excellent hybrid of GeForce GTX 650 Ti and GeForce GTX 660.
Jun 24, 2013 · Video cards: NVIDIA GPUs
|
|
Added the test results of NVIDIA GeForce GTX 770/780.
Jun 03, 2013 · 3Digests
|
| Latest News | More RSS |
Platform · Video · Multimedia · Mobile · Other || About us & Privacy policy · Twitter · Facebook
Copyright © Byrds Research & Publishing, Ltd., 1997–2011. All rights reserved.